Table of Contents
Week 2: Digital Bodies
The Brief: Create a model of a body part using different digital tools and design methods.
Adriana, our course co-ordinator, gave us the brief of designing a part of your body. We could choose between our head, torso or a limb. There was also an option to make the limb move with a joint. I choose to make a model of my hand.
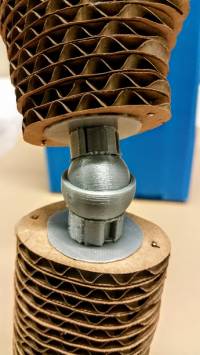
Initially I planned on making the fingers have individual joints but I changed my design to incorporate a wrist joint. The wrist joint is a ball and socket joint which I downloaded from: www.thingiverse.com
Processes of the Hand:

1. The first step was to 3D scan my limb. I did this with the help of my colleagues using the iSense scanner attached to an iPad. After a few unsuccessful attempts at getting a complete scan we managed to get one with enough details to work with.
2. I transferred the final scan to Meshmixer. This was a useful programme as it allowed me to edit small details and imperfections from the scan. Luckily the scan was successful so the only things i had to edit were the fingertips of 2 fingers and make the whole object solid.
3. After the editing process of the 3D model I used the programme Slicer for Fusion 360 to “slice” my model. After inputting the dimensions and settings of my material I was able to see how the final product would look like.
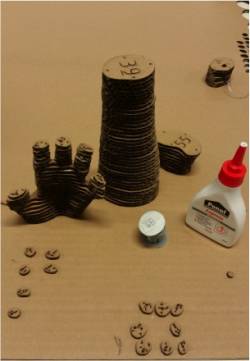
4. In order to laser cut my model, the images had to be edited in Adobe Illustrator in order to achieve the solid line outline. Because I was working with very small pieces I didn't want to cut the numbers through the piece and instead chose to engrave them. I achieved this by altering the settings in the laser cutter. I decreased the power of the laser significantly (much lower than that needed fo the cutting of the edges of the pieces). Because I had edited the pieces in Illustrator I made the outline of the pieces completely blue and the numbers completely red. When inputting the settings for the laser cutter I could then differentiate between what I wanted engraved (the red) and what i wanted cut out (the blue).
5. Because my material was cardboard, the laser cutting process went relatively fast.
Processes of the Wrist Joint :

1. I had originally planned on doing individual joints for the fingers but changed to make one wrist joint.
2. To make the joint I could either laser cut wood and assemble it, or 3D print it.
3. I used the Thingiverse website to find a suitable joint which I could download. I found one I liked very much, a ball and socket joint that could be 3D printed.
Link to download the file : https://www.thingiverse.com/thing:70366
4. I used the Cura programme to edit the design as I had to scale it down in order for it to fit my hand model. I scaled it down to 23% of it’s original size. Using this programme I could also determine the settings I needed for the 3D printer.
Printer specifications
Printer type: Ultimaker 2+
Material: PLA
Nozzle size: 0.4
5. I added support structures to the sides to make it more stable during printing and use.
6. Unfortunately I scaled it incorrectly and I could see at the beginning of printing that it would be too big. I aborted the printing procedure and scaled it down again to make it fit.
7. Printing took around 45 minutes. Once the print was completed I trimmed the edges of the base and put the 2 pieces together, luckly they fit into each other perfectly. It is a bit loose but this is something that can definitely be improved with more experience in 3D printing
Assembly process:
The assembly process was simple as Slicer for Fusion 360 prints the assembly steps with numbers onto the different parts and you can follow the process of how to put it together in the programme. I assembled the parts using glue and sewing pins for more support.

Errors / Improvements
1. Problems in scaling/ size. The final model came out a bit small and this made the assembly of the finger tips a bit difficult. I suggest making it a bit bigger.
2. I lost a few of the very small parts so I simply made “replicas” to fit the size.
3. The joint is a bit loose and could be a tighter fit.
4. The model as a whole is stable but the fingertips, due to their size, are a but fragile.
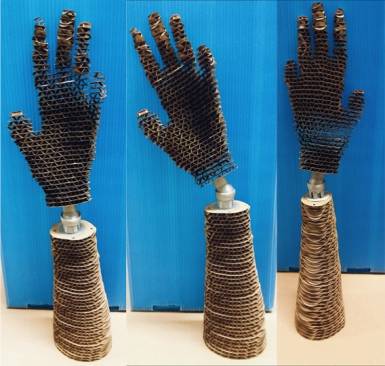
I am very happy with the final model as it was my first time using these new programmes and the 3D printer and only my second time ever using a laser cutter. I learnt a lot, things I’ll definitely be using in the near future for this course.

The comleted handwith moveable wrist joint