Documentation 11.10.2017
Today we did some patterns, with positive and negative pieces. Because this is the week’s assignment, we just train a bit.
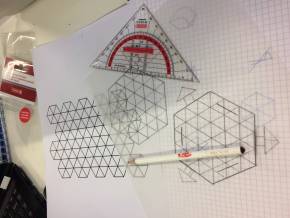
Therefore we used paper and different motifs, Adriana brought today. Then we had the task to try the different forms and bring it on transparent paper. After that, we should think about the positive and negative patterns and draw them. Then we had time to cut out the patterns and try to put them together. We created our first seamless object.
Important for this week’s assignment ist hat every part needs to have positive and negative pattern, so you can put them together seamlessly.
At 15 o’clock, Mark joined us and explained us how we can draw patterns with Rhino. Therefore, he firstly explained us the difference between vectors and pixels.
The best thing about Rhino is, that it can be pretty easy to draw patterns with it and copy them infinitely, but therefore you need the basics. And Mark showed us these basics, so we can work with Rhino by ourselves.
Some basics Mark thought us are:
When you double click on one of the views, you only get this one on your screen → double click on „Topview“ and only the „Topview“ is shown
Gumball → with this function you get a tools in your objects so you can move them → arrows for moving horizontally and vertically, or the little boxes/squares to scale your objects, the green-red grid is for moving the object in any direction without any boundaries on horizontal or vertical axis
Record History → when you activate this option, copy your object, and then you can change something at the original, the copy will do the same change
Copy-function on the left side → click on the button and then on the object and now you are able to do infinite numbers of copy
Align-objects-function → for this object you select all the objects you want to line up → in the command line in the top of the screen, Rhino asks you how to align the objects, in which direction (horizontal, vertical etc). Then you have to press enter, and the objects will be aligned as you wanted them to be.
Array-function → this is probably a very nice function. First, we tried the rectangular array. Therefore, Rhino asks how many objects you want to have in the different directions (x-,y-, z-direction / example: x- and y-direction: 10, z-direction: 1). Defining the unit cell or the X-spacing (there is the same option for the y-direction), you decide how big the gap between the different objects shall be. The last step ist o press enter and accept the settings for the array-function.
A nice tool to support the array-function is the BoxEdit-function . Therefore, you do a right click into the box on the right of the screen, click on „add BoxEdit“ and another tab will open in this box. Here you can see the size of your object in all directions, so with this option you can even better work with the array-function.
Edit points on → after clicking on this item, you get „checkpoints“ on your objects and with this function you are able to pull the object in different direction → if you have a cirlce and click on edit points on, then you can pull one point to create a tip for example.
Move function → this function is for moving objects in your screen. With this function you are also able to move them towards each other.
Trim function → this option gives you the possibility to cut lines out of your object → example: flower, where the leaves are overlapping
Mark left us roundabout 16:30 o’clock. Then, we had time to work on our first task, the patterns out of paper.
In this time, we could also think about an idea for the weekly assignment. What do I want to design out of patterns? What could look good out of patterns, without any seams?
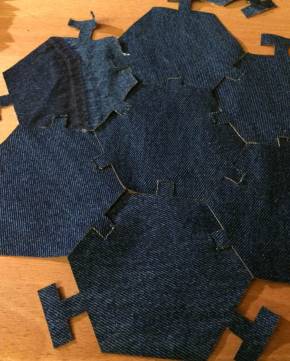
I decided to design a cloth bag out of hexagons. As connection I firstly thought about arrwos, but then I decided to turn the arrowhead into a rectangle, so there will be a uniform load on the whole connection and not only on the left and right arrow peaks.
The reason for this decision was that the bigger the force is, the easier the arrow rolls together and will maybe tear out of the connection slot.
Another thought is not to do a slot but just a small round cut into the material, so the arrowhead is not able to slip out.
Weekly assignment idea
Create a cloth bag out of hexagons, seamlessly connected with arrows which have a rectangle as head.
Measures of the bag: 30 cm wide and 38 cm long
As material I will either use jeans or a tablecloth
Jeans: 100% cotton, 13 oz. Denim, Indigofarben
Tablecloth: 70% cotton, 30% polyester
Measure of the connections : slot: 1 cm , arrow: 1 cm , rectangle (arrowhead): 3 cm , distance between slot and egde: 1 cm , length of arrow: 1 cm
Question: Can I use jeans in the lasercutter or will it frazzle like cutting jeans?
Documentation 12.10.2017
Today we met at 16 o’clock at the FabLab and Adriana gave us a tutorial about using Rhino for designing clothes. We tried to do a “Korsett” on Adriana’s bodyscan. Therefore, we draw lines out of the armpit, around the left breast, down to the bellybutton and then back to the hip. Then we had to project the lines onto the body, but I don’t know why it doesn’t work on my laptop. The next steps were to mirror the lines to get a whole “Korsett” and then do a surface, so Rhino can measure the area we are working with.
After this tutorial we had time to work on the weekly assignment. For this, I got some help of Laura. I draw a hexagon in Rhino with the polygon-function and set up that is has to have 6 sides. After pressing enter, I received my hexagon. The next step is to draw the slots for connection parts, the patterns. The slots are the negative ones and the positive ones will be rectangles with an extension, which are bigger / longer than the slot.
The measures for this are
Slot: 1 com
Distance slot – side of hexagon: 1 cm
Extension of rectangular: 1 cm
Width of extension: 1 cm
Rectangular: 3 cm wide, 1 cm high
Side of the hexagon: 5 cm
After creating the slots, I had to add the connection parts, the positive patterns. Therefore, I draw the rectangulars with extensions.
For both, I used the array-function to copy it to the other two sides. Because of the hexagon form, I need to implement three negative and three positive patterns.
After that, I copied the hexagon with the array-rectangular-function. Now I have three of them. This three I will need to test the material in the lasecutter, to get to know the settings in illustrator.
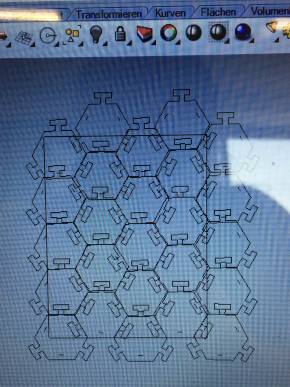
After this, I created a rectangular with the measures of my bag. I did this to get to know how many patterns I need to cut with the lasercutter.
After creating the rectangular, I copied the hexagons many times and assembled them into the rectangular (you can see this on one photo below).
I did some more, just for the worst case.
Therefore, I need 25 patterns for one side of the bag, so in total I have to cut 50 patterns with the lasercutter.
After I had this I finished my work on the weekly assignment for today.
Documentation 16.10.2017
Today I was in the FabLab from 16.20 o’clock until 20:15 o'clock.
I checked the settings of my patterns in Rhinoceros and pulled them out of the rectangle I made to imagine the clothbag.
Then I saved my patterns on a stick and went to the Lasercutter.
There I had to do different settings and firstly do a test with the lasercutter cutting jeans. Before that I decided to work with jeans and not with the tablecloth.
I need 55 patterns to do the clothbag. I counted this amount with Rhinoceros → picture
Doing 55 patterns I have some reserves.
I prepared my jeans for the lasercutter and got pieces with theses measures:
52 cm x 62 cm and
50 cm x 68 cm.
For doing a test for the settings of the lasercutter I prepared a piece of jeans, which measures 11 cm x 24 cm.
Another piece just to create the pieces for reserve, which measures 28 cm x 22 cm and 13 cm x 33 cm.
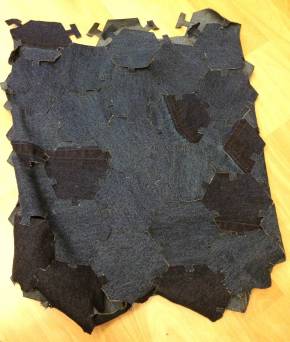
After I had my pieces,I drove home and began to create my clothbag physically.
Documentary pictures of this week's assignment
 |  |  |  |