This is an old revision of the document!
Week 8: Open source hardware - from Fibres to Fabric
(16/11/2017)
Assignment of the week:
THE IDEA:
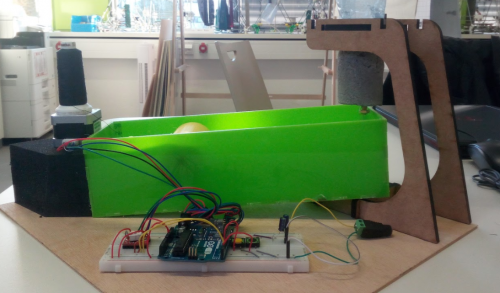
Our idea was to recreate a system that would be simple, reciprocated anywhere, and easy to make. We wanted to incorporate bioplastic, or at least the recycling of plastic. How it works, is that plastic in the liquid state (whether a bioplastic or a melted plastic) is put into the funnel, and the nozzle will create a filament, that will later be cooled in a water bath and brought out onto a spool. The spool rotates using a motor and its speed can be adjusted. The filament will then be in the spool and can be used as a thread.

BIOMATERIAL: BIOPLASTIC
Recipe and method used
PRODUCTION OF EACH COMPONENT
- Concrete Plastic Filler: Concrete and textile as scaffold 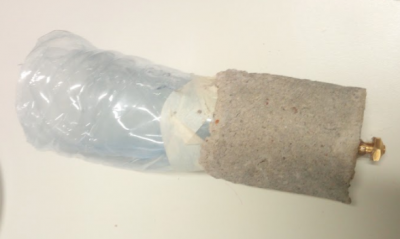
The concrete filler was used since we had to work with a material that would be able to resist melting of plastic, so it was a choice between metals or ceramic. I chose concrete since I knew how to work with it, and I just had to do a mold. We put the textile in a cylinder shape and put a conical shaped plastic bottle, with a diameter of 0.7 mm that would act as the nozzle. We let this dry for 1 hour, and then dismantled everything so that it would stay in its form. This can then be poured with melted plastic and pass through the 1mm diameter nozzle and come out as a filament to be cooled.
- Box for cold shower: Fusion 360 and laser cutter


- Cylinder: 3D printer 
In order to create a prototype of a cylinder with the 3D printer, the usage of two programs were highly necessary - 360 Fusion and also, Cura 2.4.0. This part is to roll with the line/fibers to keep it for longer inside the cold bath.
360 Fusion serves to construct a diversity of objects.Initially, a circle has to be sketched which has been a diameter of 5 cm. While creating the first circle, another circle had to be added in the middle of the first one. The diameter of the second circle amounts 2cm. Here a gap was giving within the first circle. When we extruded the outstanding circle (first circle) by 8 cm a cylinder was conducted. Eventually, saved the data as a STL file. For the purpose, to use the 3D printer Cura 2.4.0 has to be considered. Cura 2.4.0 is a program that enables to do the settings for the 3D printer. In the first place, we exported the data of 360 Fusion (type: STL). Afterwards, we rotated the cylinder vertically.
The Printing with a layer height too low might cause the plastic to be pushed back into the nozzle and the extruder will struggle to push the filament. In the worth case the plastic can expand/react/change state inside the hotend. Depending on your extruder, it can also damage the filament preventing it to properly push the filament.
Also, in the opposite situation, if the layer height is too high, the layers won’t stick properly to the previous layer resulting in a poor finish/poor rigidity of your 3D model. Therefore, we decided to use Ultimate 2+ with the novel size 0.6mm. Thus, the layer height has to be the half amount of the novel size, 0,3mm. Due to the fact, that we wanted to make the material more solid we used 1.2 mm for the wall thickness as well as top bottom thickness. Here the fill density of the cylinder amounts 20% whereby the infill pattern is “Grind ”. According to the print speed it was 60 mm/s while the travel speed amounts 120 mm/s. Furthermore, we used yellow PLA plastics as material. After being done with the settings for the 3D printer, we saved the file to a SD-card. Then we put the SD card into 3D printer and start to print the prototype. The duration was 2h 40 min.
To be honest we were satisfied with the desired outcome to create a prototype of a cylinder for the project. More or less it has been the first time working with Cura 2.4.0 and also with the 3D printer. We also can recommended, to use the settings for doing a solid object when using the nozzle size 0.6 mm.
- Electrical circuit - Arduino - Motor

FINAL PRODUCT