This is an old revision of the document!
Week 12. Skin electronics
Global Instructor: Katia Vega
In the same way that the wearables industry is integrating fashion practices in their development, we envision new partnerships between the biotech/tech companies and skin professionals such as makeup artists, prosthesis experts and tattooists in order to embrace the idea of human-device symbiosis. FX e-makeup made use of special effects makeup for hiding electronic components that sense facial muscle movements, acting as a second skin.
Hands On
Carnival Mask Option 1
I decided to do the option one, carnival mask, because, here in Brazil I couldn't find the RFID sensor
Components:
Option 1:
Skin Masquerade Party
1 Adafruit GEMMA board - I used Lilypad Arduino board
4 Adafruit FLORA NeoPixels - I used three NeoPixels from Lilypad
1 Coincell battery holder - I constructed one system
2 CR2032 batteries - OK
Thin Wires (insulated copper thin wire or silicone insulated wire) - used the thinner wire I've found here
Wire strippers, flush snips, and tweezers
Soldering iron and solder = Ok
E6000 craft glue = Ok
Plastic mask (as a mold) - OK
Vaseline or release Liquid latex or FX silicone = Used solid Vaseline
Sponge applicators- I used Brush to apllicate the vaseline
Glitter - I used HandMAde Paper , That I've prepared like in the week 07.
Multimeter - Ok
Option 2 - Twinkle Nails - I will try later when my products arrive from Adafruit.
1 Arduino Uno, 5 RFIDs, 1 RFID Reader and shield, Brushes, Fake nails, Acrylic Nail liquid, glue and powder, Wire, Wire strippers, flush snips, and tweezers, Soldering iron and solder and Multimeter
Hands On
Step 01 - Plan it
Step 02 - Skin First Layer
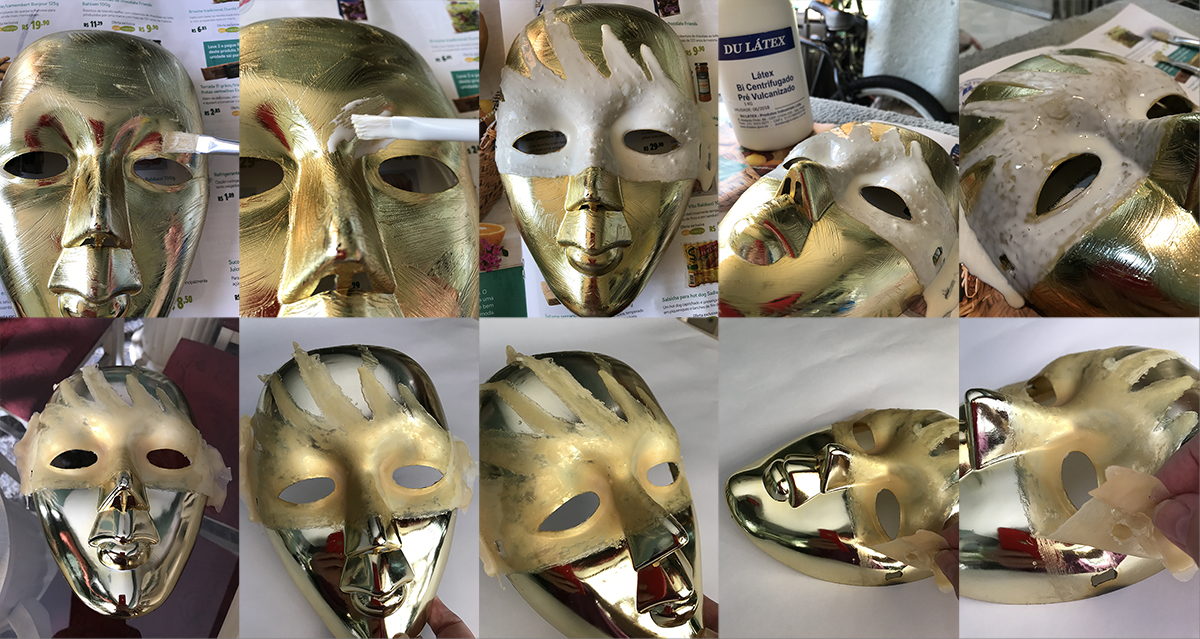
I used a plastic model for the mask. 01. I've applied solid vaseline with a brush in all plastic mask, specially inside the holes of the eyes and nose, and in all extremidites, to avoid latex to glue somewhere I didn't want to.
02. I applied the latex with another brush in several layers, waiting to dry between one layer and another.
03. I tested if the mask would unglued well from the model, and it was ok.
Step 03 - The Circuit
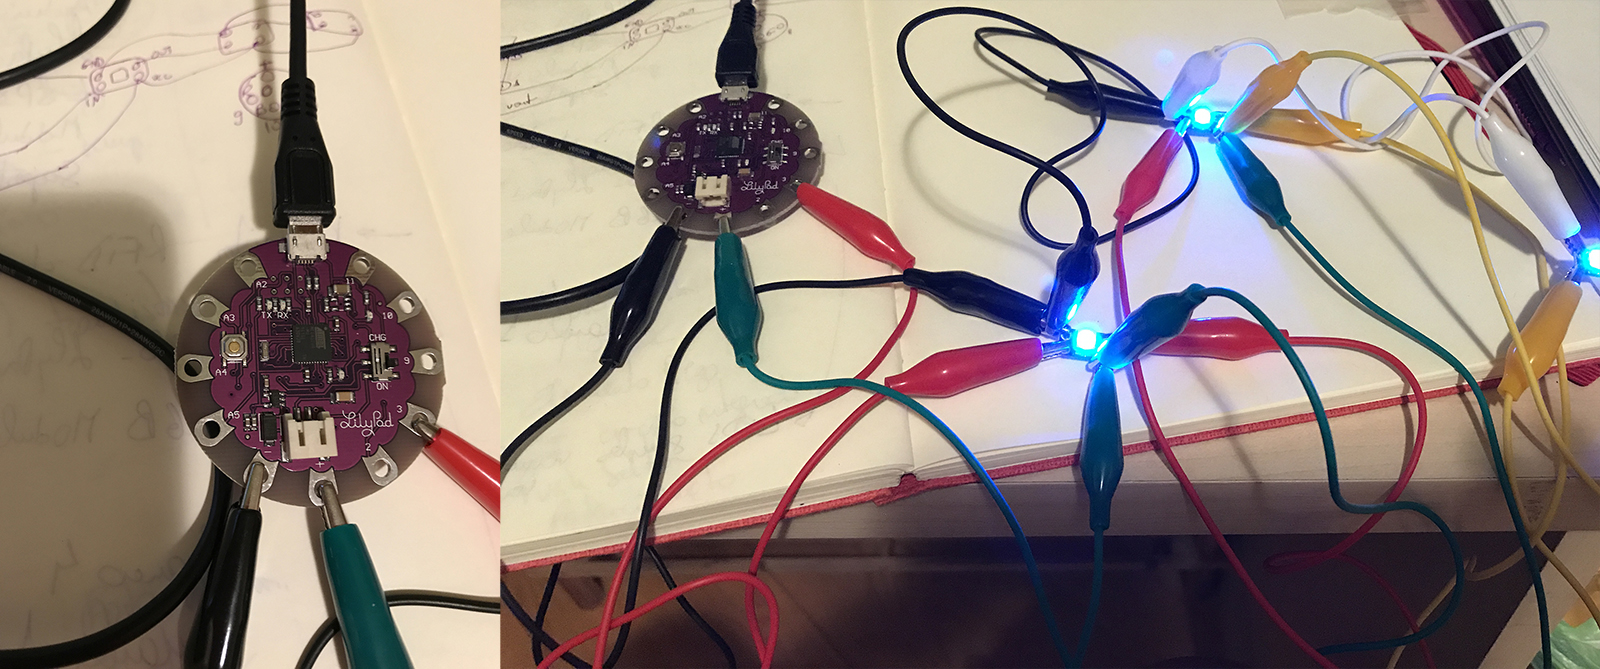
I used the LilyPad Arduino Board, and on it the Port 3 as the digital output.
On the Board I used also the micro USB to join the board to the notebook, and the negative (Ground) and positive ports.
I used also two 3Volts batteries joined by a strip and with a press sensor between them.
Them I joined the D3 from the LilyPad Board with the Din of the RGB LED Module 4 pin, WS2812, from here joining the D:Out of the first LED with the Din of the second, and the Dout of the second with the Din of the Third LED. The negative Port from the Board was joined to the GnD of the first ED, and it with the GnD of the second and this with the Gnd of the third LED and this last one was joined with the negative side of the batteries. The Positive port of the board was joined to the 5V port of the first LED, and this with the second and that with the third. Th positive port was also joined with the positive side of the batteries.
The final result was this:
Step 04 - The Code
I loved the code we received in the assignement, but it had an error that was the wheel that was not related to anything, but following the instructables, i've found the part of the code that was missing and corrected it so it worked well. As I'm not very familiar with programing , but even though i made some changes to test, but finally i decide to let the rainbow effect in the LEDs that I really loved since the beggining. And as I used another board and only three EDS I had to change the code anyway. At this point I've tested with grips the code to see everything was all right before solding the wires and fixing the LEDs to the Mask.
Finally I substitute the grips by the wires, and solded them to the LEDs and the Board.
Link to Code: https://drive.google.com/open?id=1Zb2G8VhrWvR1PYETsZIS1SJNM2og19hE
Step 05 - Assembly
In this step I fixed the LEDs with silicone tape to the Latex mask , it could be with latex too, but I preffered to put the tape, because if something goes wrong it was easier to fix it. Them I tested until all the connections were ok, and arrange the wires fix them to the mask with the silicone tape too, and in a form to reinforce the structure of the mask. To decorate the mask I didn't use glitter because it is not really a Carnival Mask, but a first prototype from my ask to the Performance I will present in Sofia next year, and that will take part from my final project.
The sequence of this step is here:
Finally I produced two Masks, one with the plastic model inside the mask, and in this case I put the board and the batteries behind the plastic Mask, and the batteries with a press sensor that was activated with my cheek. In the second Mask I pilled latex mask out of the model and used it directly in my face, and in this case the board was connected and hidden behind the flower in my hair, and the batteries pressed behind my ears.


