This is an old revision of the document!
Final Project
Serena: A wearable to combat anxiety and induce calm
Third prototype


Second prototype


Overview of project idea
I want to create a belt to induce calm in sufferers of anxiety disorder or by other people who find themselves in stressful situations. The belt is to be worn around the chest and incorporates a fabric stretch sensor over the diaphragm that detects fast breathing rates. When fast breathing is noted, this triggers the back of the belt to inflate and deflate at designated intervals that simulate a calmer breathing rhythm. The idea is that the wearer can use this slow inflation/deflation as a breathing guide to help them to calm down in stressful situations. The inflation/deflation continues for 30 seconds, after which, the belt returns to monitoring the breathing rate.
Below, you can find the presentations and videos I created throughout the process of developing my final project.
- Overview of project idea (before getting started):https://www.youtube.com/watch?v=1au-l4RWecM
- Mid term review: https://drive.google.com/open?id=1lVwJusZ7rvxVY0PM9SrO0GtZSRek6hpr
- Final project presentation: https://drive.google.com/open?id=163hr9f1myd0vx5CfzBKkUc8nFbk06K5vRXzb_JkZYQ0
- Final project video - overview of concept: https://drive.google.com/open?id=1e5HLx6PGmPdObMnTpYAtXtj7FuYJdAEl
- Final project video - demonstration of the belt working: https://drive.google.com/open?id=1GMcbMK_G8ua9M8KxKCzQJzoIA7G9vAh7
You can download the design files for the final prototype here: http://oscircularfashion.herokuapp.com/project/-LBbtC9yCbNHFkbyWvp-
To get an idea of the persona I imagine using my prototype, and the journey they undertake before, during and after using it, please visit the 'implications and applications' page of my wiki.
Sensing and actuation
I am using stretchy conductive fabric for detecting the breathing rate, as this material changes its resistance when stretched, thus giving me a range of analog values that can be used to trigger an actuation when a threshold is reached. Attached to the fabric sensor around the sides and back is the inflatable part of the belt. Referring to the Soft Robotics Toolkit website, I want the inflation and deflation of the belt to be controlled by a DC air pump and 2 valves that connects to the back of the belt through an air tube. The effect I want is for one valve to allow air to be pumped in, and the other valve to suck out the air - thus causing the inflation and deflation of the belt. In the ideal product, the PCB and output devices would be powered by an external power supply, in order to be fully portable.
First prototype
Components and design of first prototype

I used Shieldex Technik Tex stretchy conductive fabric as the breathing sensor that is placed over the diaphragm and detect the breathing rate. I wanted the inflation and deflation to be placed as near to the chest part of the body as possible as this seems the most appropriate position over the lungs and would also provide a reassuring feel. Therefore I chose to have this part attached to the sensor in a belt design. I thought there should be stiffer material, such as felt, joining the fabric sensor to the inflatable - to give a stronger structure. The hard components (air pump, valves, PCB, battery) I thought would be too heavy and bulky to be attached to the belt, therefore I decided to create an extra pocket to house these components that the user would wear around the waist. Also, because the fabric sensor had to be connected to the PCB to register its readings and because there needed to be an air tube between the air pump/valve and inflatable part - I decided to have these running down from the chest belt to the pocket.
Designing and creating the inflatable
I didn't want the inflation to be too big around the chest as this would feel uncomfortable, therefore I wanted to have some parts sealed. Also, sealing some parts meant that it would be quicker to inflate. I also wanted to allow for a slight curve in the structure - as it would be placed around the ribcage. Therefore I did some research into an optimal structure for this using MIT Media Lab and one of their projects, Aeromorph, and designed the structure below. I used 2 sheets of heat transfer vinyl and baking paper for the inside part to create the air channels. I placed the 2 sheets are placed on the heat press with the baking paper sandwiched in between the sheets and fused together the material, leaving the air channels unsealed (heat 115 degrees for 15 seconds).


The inflatable structure wasn't too rounded which was ideal but I needed to see if the wearer would feel its effect when worn around the ribcage. I therefore tried on the design and inflated it - the effect was discernable and appropriate.
Production of the belt
I designed all the fabric pieces I needed in Rhino using my own body measurements for the sizing. I used the vinyl cutter for the inflatable because it was recommended to me and for all other pieces, I used the laser cutter.


I then used the sewing machine to sew together the traces path to the inflatable, the felt strips to the fabric sensor and inflatable, and conductive velcro to the felt strips.


I needed to create traces from the fabric sensor to the PCB - to do this, I used conductive thread to sew traces from each end of the fabric sensor around the back of the inflatable, and down the traces path to the PCB.


I made sure the traces were strong at the corners and at the fabric joins by going over them again by hand with conductive thread and a needle.


Amendment
Once finished, I connected the velcro pieces together and used an analog read sketch on the Arduino to find out what kind of analog values I had from the fabric sensor and the attached traces. I discovered that the values couldn't read properly because the resistance was too high in the conductive thread traces, and therefore conductivity for the readings was not good. Altogether, there was 300 ohm resistance. The particular thread I used was highly resistant and also the traces were rather long as they had to travel from the sensor, to around the back and then down the back.
I still wanted to keep the path going down the back from the belt to the PCB and hard components, because I still believed it would be too heavy and cumbersome to attach this directly to the belt. Therefore I used a less resistant fabric for the traces.
I chose a low resistance material and designed traces in Rhino to be laser cut, pasted with fusing paper and ironed on to the belt. The rest of the belt was put together as before.


Production of the PCB
I wanted to design a PCB to enable the air pump and two valves to be connected and to incorporate all the transistors and diodes needed for the devices, rather than to have these separate and loose from the microcontroller. To be fully portable, I also needed a portable power supply like a battery which would power the output devices with 6V, so I also incorporated this facility into the PCB. This meant that I needed a voltage regulator to step down the power to 5V for the PCB. Instead of having all of these components loose and separate from the board, I incorporated them into the board to make connecting everything easier. I included pin headers not connected to the microcontroller which would connect to the external battery.


Code for sensing and actuation
Initial statements

In this section, I stated the specific pins for the input and output. I had to include the software serial library as I was using my own PCB. I also stated here the variables for the calibration part of the program.
Void Setup

In the setup, the sensor pin is declared as an input and the pumpPin as an output, the software serial is initialised. Also in the setup, there is some code that calibrates the device in the first 5 seconds of starting and ascertains the threshold value in this process. This piece of code essentially notes down the highest value reached and sets the threshold as 99% of the highest value. To make sure that the pump is off at the start, I wrote digitalWrite pumpPin LOW.
Void Loop

In the void loop, the first part of code sets a timer for 30 seconds - and the program carries out the remaining code during this 30 seconds. The current value from the sensor is read, and if this value is more than the threshold value that was automatically set in the void setup, it counts it and the counter increases by 1 every time the threshold is reached - thus counting the 'breaths'. Once the 30 seconds are over, the program will write 'Measure done' and either trigger an actuation or begin again to count the values over 30 seconds.
An actuation is triggered if there are more than 10 counts of the threshold being reached in 30 seconds (ie. more than 10 breaths in 30 seconds). The if statement starts with a counter for 30 seconds, so the program will execute the following steps for 30 seconds and then return to the beginning of the loop where it counts again the stretching of the material. During the 30 seconds, the DC motor is turned on for 1 second - so it inflates the belt, and then turns off for 4 seconds - therefore allowing some air to escape the belt, thus deflating. It does this continuously for 30 seconds, after which, the motor/pump returns to a LOW state.
Compiling the belt and testing
The belt part for the first prototype looked like this:


I connected the inflatable part with an air tube that ran down to the DC motor. The ground of the motor was connected to the designated pin on my PCB. The adjustable voltage regulator that I had incorporated in my PCB was not working properly, therefore I powered the output devices separately via an external power supply to get 6V, whilst I powered the PCB with 5V from the computer. The ends of the fabric sensor traces were also connected to the PCB - the sensing side connecting with its designated pin, and the other side connected to VCC, in order to read the stretch sensor's values. I connected an air tube from the outlet of the DC motor to the inflatable belt which laid on the table. The analog values were read from a second belt that I was wearing.


The calibration part of the code worked, however because the values tend not to be fully accurate with this Shieldex Tex stretch sensor, the best threshold was not always obtained. Many tests were made to count the breaths in the best way, and in the end, I had to exaggerate my breathing in order to obtain a difference in values and to count a breath.
In an earlier test, I couldn't get the 2 valves to work together - with one valve allowing the air to pump and the other valve vacuuming the air. Therefore in this test, I used just one valve to allow the inflation. However, during testing this time, it became clear that it didn't make sense to have the DC motor and one valve to open the channel to let air into the belt - the valve was useless and the same effect could be achieved by connecting the DC motor directly to the belt. If, however, I managed to get 2 valves working so that one valve opens the air channel and the other valve vacuumed the air - this would be ideal.
There was also a problem with the air remaining inside the belt and not escaping fast enough to give room for the next inflation from the motor. I had to make a couple of holes in the belt in order to let some air escape. Again, if I could get the 2 valves working properly - this problem would be solved.
Despite the problems mentioned here, in theory, the concept worked but needs a lot of refinement. Here you can see a video of the concept working.
Next Steps for Second Prototype
- Use an amplifier to give better analog values or find a more sensitive stretch sensor (perhaps knitting one)
- Research if there's a better way to establish/count a 'breath'
- Desolder and resolder a new adjustable voltage regulator
- Make the 2 valves work for pumping and vacuuming
- If vacuum valve doesn't work - find a better way for enough air to escape for the next inflation
- Connect a battery to the PCB to make the product portable
- Add wires from the sensor traces from the belt to connect to the PCB
- 3D print or mill a case to contain the hard components to keep it tidy
- Create a pocket to keep the hard components in place
Second Prototype
Fabric sensor refinement
Load cell amplifier test
For me, the most critical technical aspect to improve in my first prototype was to achieve better analog values. Exaggerating the breathing movement in the test, although it worked, is not the ideal way I wanted this belt to function in a realistic way. Therefore I had some help from a FabLab colleague experienced in electronics to experiment with attaching a load cell amplifier (Sparkfun HX711) to the circuit - this is a device that can take very small changes in resistance and amplify them, turning them into something that can be measured accurately.

We conducted many tests that connected the load cell amplifier to the arduino and various load cells (a potentiometer, weighing scales) before experimenting with the fabric sensor. We used the Sparkfun hook up guide and a diagram of a 3 line load cell connection to set up the test. The load cell amplifier operates using the Wheatstone Bridge circuit which has 4 resistors arranged in 2 parallel series. When all the resistors are balanced, the Vout reads 0, but when there are any small changes in one resistor, this change will be read by the the multimeter - which is directly proportional to the change in the resistance of the resistor. This is useful when trying to discover an unknown resistance accurately.

After achieving a sound test set up, we then experimented with a small piece of the Shieldex fabric used in my belt. Using the load cell amplifier worked with this fabric in terms of amplifying the analog values, however, it became clear that the Shieldex was too unstable. The biggest problem was that after stretching, the fabric would take a longer time than desired to return to a normal, steady state. This was not ideal - I needed the material to return to rest faster so that the next breath could be sensed accurately. It is likely that this problem is due to the fabric being woven in two directions.
Load cell amplifier with own sensor
My colleague suggested that a more reliable reading would be achieved with fibres going in one direction only - this would reduce the instability and perhaps would be faster in reaching the resting state after being stretched. With no such ready made fabric in the lab, Adriana suggested to construct my own from a piece of non-conductive stretchy material and sew a short, single zig zag line of conductive thread. The zig zag formation would allow for the stretch movement of the material, and a short piece in order to reduce as much as possible the instability of the fibres. I made the one below.

We used this piece of fabric in our test set up, and it worked better. The fabric was more responsive when stretched, with large analog values due to the load cell amplifier, and when the fabric was released, the analog values returned to baseline quicker than with the Shieldex material.

Other designs of own sensor
As the fabric piece above was made rather roughly, I experimented with creating other designs in a more systematic way using the embroidery machine. The designs in the image below are 9cm wide. The middle design gave a higher resistance than the other two, and did not change its resistance smoothly, perhaps because the stitches were made in a run rather than in a pure zig zag fashion. The best and most stable in terms of resistance change was the third design, although I think a better change would be achieved if the zig zags were closer together.

Disadvantage of load cell amplifier
A few days after the success of the load cell amplifier test, I wanted to try out the pieces I created in the section above. Before doing this I first tested the exact same set up done days earlier with the roughly made fabric piece, but it did not work. This was because the load cell amplifier, which is based on the Wheatstone bridge principle, only works when the 4th resistance (which comes from the material) is exactly the same as the other 3 resistances. This meant that the exact resistance would have to be obtained each time the user put on the prototype - essentially, they would have to connect the wires at exactly the right spot to achieve a certain resistance value. Although this could technically be done through employing some kind of sliding potentiometer set up, this would take a while every time the user put on the belt and would be generally inappropriate to require the user to do this every time.
With this knowledge, I was then disinclined to use the load cell amplifier. I needed to continue with the project without one and use only a sensor. The stitched designs I had created did not give the range of values I wanted when using them alone without an amplifier. I had to find another alternative.
Eeon Tex Stretchy Fabric as a sensor
Unsure how to proceed, I approached some mentors of the Fabricademy, Becky Stewart and Mika from Kobakant, and explained my problem and asked for suggestions on other material I could use or any other methods. Both mentors suggested to try a small piece of the Eeon Tex Stretch Fabric for my sensor. This fabric was created and is used specifically to act as a sensor, rather than the Shieldex material which merely has some sensing capabilities. Fortunately, there remained one small piece of this fabric in the FabLab, so I used this to test the values whilst breathing.
I found that this material was much more responsive than the Shieldex and returned to base level more quickly. The analog values given whilst breathing were also decent - giving a change of around 30 digits, as opposed to a change of 10 with my created ones, therefore it could be used effectively without an amplifier. Here is a video of me testing the Eeon Tex:

Constructing the sensor belt
I incorporated the small piece of Eeon Tex into a thin, rigid cotton belt that I laser cut and made adjustable with velcro. I hand sewed the Eeon Tex to the belt with conductive thread to improve conductivity when I would later come to connect this to the traces from the sensor to the PCB. I produced one belt for the sensor and aimed to produce a second, separate belt for the inflatable. I did this because my colleague suggested in my first prototype that having the inflatable at the back of the belt meant that when it inflated, it would pull on the sensor fabric part of the front of the belt and could disturb the readings.


For the sensor traces, I used jumper wire as this would be better in terms of conductivity and isolation, than using again laser cut paths of conductive fabric. I soldered the ends into loops as you can see in the first image below, and then sewed these onto the Eeon Tex with conductive thread.


I placed some stitches along the belt to secure the jumper wires in place and also maintained slight loops of the wire under the sensor to enable the stretching of the sensor.

I used this set up to test the analog values whilst breathing and found that it still worked well - there was still a decent range in the values whilst breathing and it returned to base level in sufficient time. After some time of trial and error, I found the most appropriate pull down resistor to use with this set up was 270K ohm, which would be attached to the PCB.
Production of inflatable and re-testing inflation
As mentioned in the previous section, my goal for the second prototype was to have the sensor and the inflatable separate. I created a single belt of the inflatable structure with velcro for adjusting the size.

My desire after the first prototype was to make the valves work so that one would inflate the belt and the other would vacuum the air out of the belt. I sat down with another colleague experienced in electronics in order to try and make this work. After much testing with various configurations and code, we concluded that it was not possible with the set up and components I had. The current set up enabled air to inflate through the first valve and the second valve allowed the air to escape, rather than be vacuumed. This, however, was better than nothing, therefore I used this configuration in my second prototype.

Fixing of PCB and connecting battery supply
As I mentioned earlier, the adjustable voltage regulator wasn't working therefore I removed this from the board and resoldered a new one. I also removed the 100 ohm surface mounted resistor I had connected to the fabric sensor pin, and replaced this with a 2 female pin headers - so that a normal external resistor can be placed here. This was more ideal in case a different resistor (different than the 270K ohm I planned to use) would be needed at any point in the future. I also had to resolder one of the transistors and a pin header which had come loose through wear and tear since I produced the board.

After the adjustments, I tested the PCB with a colleague experienced in electronics at the FabLab and found that it generally worked fine but there was still a problem with the voltage regulator - it wasn't stepping down the voltage to 5V, instead, it was giving the board 1.5V. After much investigation with my colleague, we discovered that the schematic for the voltage regulator was wrong. To be effective, it needed to have a voltage divider circuit with 4 resistors. I had these resistors on my board but there were not placed in the right place. Therefore I soldered a jumper wire to make these connections and I also had to break some connections. In the end, the voltage regulator worked well.

I was now able to connect one power supply to the PCB and the voltage regulator worked to give the devices 6V and the board 5V. I proceeded to connect a battery power supply to the designated pins on my board.

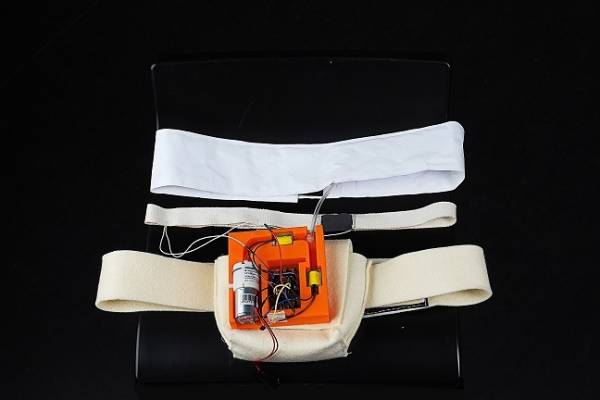
Design and production of the casing
I wanted to produce a case to arrange and contain the hard components. I roughly arranged how I wanted these to be situated and used Fusion 360 to design something to this effect and 3D printed it with PLA.


Once printed, I fitted the components inside and adjusted the lengths of all the jumper wires by cutting and soldering the wires together and adding female pin header connections at the ends. I did this to reduce the volume of the area. I also cut the air tubes to length and created a T connection between the 2 valves by cutting a hole in one tube, inserting another tube in the hole and sealing the sides with a hot glue gun.


Testing of the system
I then proceeded to test the whole system as it stood at the moment, including the battery power. The system worked well and as I desired. Here is a video of the prototype working:

Production of the pocket
As the deadline was drawing very near, I hand designed and cut the pocket out of felt material rather than designing something more sophisticated in a design program. I chose felt because it is stiff enough to hold the components and it is easy to cut quickly by hand. I created the shape below.

I had to hand sew the pocket together as it was difficult to sew with the machine once the pocket adopted a 3D shape. I cut 2 lines in the back of the pocket so that the belt could be thread through it. I also cut a small hole in the top of the pocket so that the air tube could be put through here and travel to the inflation belt.


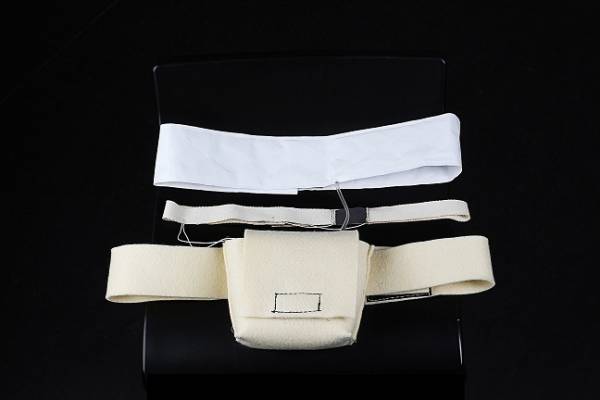
Finished prototype
Finally, all the parts to the prototype were finished:

Here is thevideo I made for the final presentation of the prototype working on the body:

Next steps for further improvements
- Given that the major technical aspects of the design are now sound, and following feedback I received at the final project presentation, I would like to focus now on the aesthetics of the design to make it more attractive. I may experiment with new shapes for the inflatable and for the structure as a whole, not limiting it to a belt structure. I would like to find a better feeling material for the inflatable, perhaps using the velvet transfer vinyl as suggested by Cecilia.
- At the moment, the system is cumbersome to put on and to wear - needing 3 separate belts, the wires/air tube to be connected and the big pocket. I need to think about a more efficient way to put on the system and about comfort for the wearer. This probably entails a whole new design.
- The video of the prototype working on the body shows that the belt doesn't inflate very strongly and not as much as I'd like. I will need to investigate why this is and how to increase the effect.
- The pocket/hard components are at the moment, bigger than I desire. I would like to research if there are powerful, smaller components I could use.
- I would like to find components that allow for the vacuuming of air.
- Perhaps look at another or an additional way to measure and monitor anxiety - such as heart rate or sweat.
- Perhaps look at another way to count a breath.