Biodyes and biofabrics
1. Natural dyes :
We can use products from the nature like hibiscus or madder to dye fabrics (doesn't work with the synthetic ones). Every parameter is very important because it is very complicated to obtain two times the exact same colors.
 .
.
We did a few tests on different types of natural fibers :

1 : wool
2 : cotton
3 : silk
4 : hemp
5 : linen
Step 1 :
Boil the fibers to take off the oil (only for the vegetal ones), during about 30 minutes. A lot of water in the pot is good because the fibers can move more and dye better.

Step 2 :
Add the mordant :
If you use alumn, you get yellow/orange colors (quantity : 15% of the weight of the fibers)
If you use iron, you get darker colors. (quantity : 50% water 50% vinegar copper)
If you use copper, you get blueish colors (quantity : 50% water 50% vinegar copper)
If you use water soda (biocarbonate) you will low the Ph and get pinkish/purple colors.
Step 3 :
Add the dyeing product :
- Brazil wood : pink
- Hibiscus : fuxia
- Curcuma : yellow, orange
- Annatto : orange, peachy colors
- Alkanet : grey, purple (and you can dye all the way to black if you mordant with iron)
- Onion peals : light brown
- Beetroots : dark brown


To make the wool and silk softer you can also add cream of tartar (8% of the wight of the fibers) :

Step 4 :
You can do a color change after the dyeing, by using the same products than for the mordant (alumn, iron, copper, vinegar).
This color change can give you 25 different shades.
The copper makes blue colors.
The iron makes colors sad.
The alumn makes colors bright.

Example here with madder
How to mesure the Ph :
Use a Ph reader :

Small numbers = more acid
Big numbers = more basic
Soa and vinegar are Ph modifiers.
Experimentations :

Fiber 2 with alkanet : put a piece in alumn (top) and a piece in vinegar (bottom) :

 We let them cook during lunchtime, then we take them out of water ,and rince.

Then we made a classification :


 .
. 
We also did two other tests :
- Lichens water soda : the fibers turns pink

- Water hibiscus :

Conclusion :
We got very dark colors, probably because we let the fibers boil with the dyes and mordants for too long.
Note :
To recognize the fibers :
- With alum : 2 notes
- With copper : 3 notes
- With iron : 4 notes
- Untreated fiber : 0 notes
Then do a notes on the other side of these fibers to make a group an put it inside the natural dyeing you want.
2. Bioplastics:
Step 1 :
Mix your pigments in a plastic glass for the color, or use colored water (for example the left over from the natural dyeing process)
Step 2 :
Add gelatine and glycerine : 1 part glycerine 4 part gelatine 20 part water
- 1st sample : 12g of gelatine 3ml of glycerine 60ml of dyied liquid
- 2nd sample : 12g of gelatine 9ml of glycerine (we want it more flexible so more glycerine) 60ml of dyied liquid
- 3rd sample : 12g of gelatine 6ml glycerine 60 ml of water a bit of gold paint after mixing
- 4th sample : 12g of gelatine 0,5 ml glycerine 60ml of water
- 5th sample : blue paint gold paint glycerine (add it quickly so the colors don’t mix too much together and you can still differenciate them) water from the copper (blue) soap liquid
If you want a foam you have to add around 3ml of liquid soap, then mix faster.
You can also do the other way around : cook then add the color (for the acrylic because more concentrated).

New recipe for the bioplastic mix :
You can also do it with agar powder (thicker and more transparent, not with the yellowish color from the gelatine) : 300m of water + 20ml of glycerine +12g of agar
You have to use a lot of water and glycerine because the agar doesn't mix easily with the rest and stays thick
Note = be careful twith the agar the bioplastics shrink when they are completely dry.
Step 3 :
Mix everything and then cook it for around 10 minutes.
When you cook there should be no bubbles and when it starts boiling slowly it means it's ready.
The more you let it boil, the faster it will dry but if you boil too much it gets brittle.

Step 4 :
Pour in a mold or on any plane plastic/glass surface.
It will take about 30 minutes to dry, and if you let more it could stick to the surface.
If you want a second layer on top but with a different color, the first layer has to be really dry (when it is not cold anymore) and the top layer shouldn’t be too hot either or i twill melt.
Experimentations :
 .
.  .
.
New recipe for the bioplastic mix :
You can also do it with agar powder (thicker and more transparent, not with the yellowish color from the gelatine) : 300m of water + 20ml of glycerine +12g of agar
You have to use a lot of water and glycerine because the agar doesn't mix easily with the rest and stays thick
Note = be careful twith the agar the bioplastics shrink when they are completely dry.
Test 1 :
12g gelatine + 6ml gelatine + 120ml water + white paint + bolts
The sample broke when I took it out from the mold becasue there was too much water in the mix.


Test 2 :
12g gelatine + 5ml glycerine + 100ml water + liquid green soap + white paint + silver paint
Pour the mix on this greenish furry fabric.

Test 3 :
12g gelatine + 9ml glycerine + 90ml water + liquid white soap + white paint + red paint (at the very end so its doesn't mix too much with the rest)

Test 4 :
12g gelatine + 6ml glycerine + 80ml water + white liquid soap + white paint + silver paint + lichens
The lichens turned pinkish/orange inside the bioplastic.

Test 5 :
A : 12g gelatine + 9ml glycerine + 90ml water + white liquid soap + white paint
B : 300m of water + 20ml of glycerine + 12g of agar
Pour on a soft polyester white grid.


Test 6 :
300m of water + 20ml of glycerine + 12g of agar + silver mylar foil
A : A part of the foil can stay out from the mix so you can get volume coming out from the bioplastic
B : The foil is completely immersed inside the mix

Test 7 :
300m of water + 20ml of glycerine + 12g of agar + greenish furry fabric

Test 8 :
I tried to embroider on the first bioplastic test I made.
My first idea was to embroider around a hole but the bioplastic was too fragile and was tearing apart.

Then I tried to embroider without the hole and it worked very well.

Test 9 :
300m of water + 20ml of glycerine + 12g of agar + foil
I tried to pour a thin layer iridescent mylar foil but because of the texture of the foil the bioplastic couldn't melt on it and they separated.

Test 10 :
300m of water + 20ml of glycerine + 12g of agar + fabric
A : I cut a few stripes from a fabric and dived them into the mix.
B : I just poured a thin layer on top of the fabric.
The fabric was weaved with small holes in between every threads, which allows the mix to run inside this holes and really merge with the fabric. And the bioplastic was still flexible after drying.

Test 11 :
300m of water + 20ml of glycerine + 12g of agar + laser cut
I used the left over from the mix who dried inside the pan and laser cut it with this settings :
- speed : 90
- power : 30
- corner power : 15

Test 12 :
300m of water + 20ml of glycerine + 12g of agar + silver plastic pearls

Test 13 :
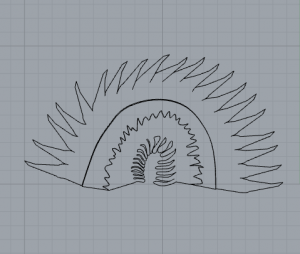
I tried to create a mold. My inspiration were the patterns from the fish skins :
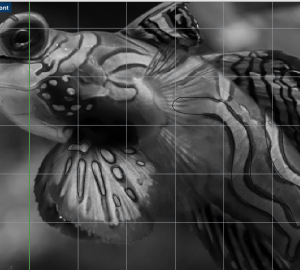

I used this picture to recereate the shapes I wanted on Rhino : select “Background Bimap” on the settings, and the image will appear under the grid as a guide.
When you are done you can just select “Remove” to delete it.
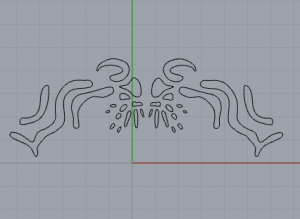
I tried a few different pattern combinations and laser cut one of them in a 3mm plexiglas with this settings :
- speed : 20
- power : 100
- corner power : 50
Then I used a special plexiglas glue to attach the cut plexiglas on another plane shit of plexiglas to create a mold I could pour in.

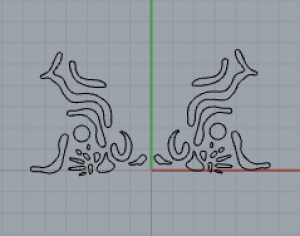
Test 14 :
Same technique than the last test for the mold but with another shape and another mix :
12g gelatine + 9ml gelatine + …

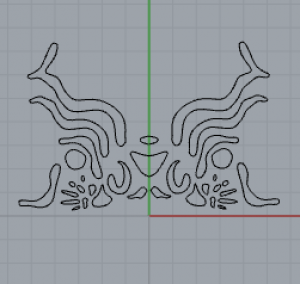
Test 15 :
Same technique for the mold but with a different shape and a different mix :


Test 16 :
300m of water + 20ml of glycerine + 12g of agar + plexiglas pieces
I used some cut pieces of plexiglas left over from the test 13 and dive them into the mix.

3. Bacteria dying :
Process :
Step 1 :
Prepare the bacterias food :
- Nutrient Agar : Take the 500 ml bottle and fill it up to 125 ml with water and dissolve 2,5 gr of nutrient agar (dosage is 20gr / liter). Add 0,5 ml of glycerine with a pipette.
- LB Broth : Take the 500 ml bottle and fill it up to 125 ml with water. Dissolve 3,5 gr of nutrient broth (dosage is 25gr / liter). Add 0,5 ml of glycerine with a pipette.
Close the bottles with the caps and mix a bit. Unscrew the cap a little bit so that it’s not sealed.
Step 2 :
Prepare the textiles :
Prepare their shape the way you want it (you can fold or twist them) and place them inside a plastic disposable autoclave bag.
Step 3:
Sterilize with the pressure cooker.
Add around 1 liter water inside (as reference: less than in the liquid in the bottle you are sterilizing).Then put the bottles and the bag with prepared textile if you want to dye them.
Set the pressure cooker to high pressure and set the electric cooker at the highest temperature until it starts steaming (takes around 15 minutes than the red button goes up).
Now press the button and put the electric cooker’s temperature to low heat for 15 minutes (put a timer).
Step 4 :
Prepare the petri dishes :
First, write all the information on the back :
- food name
- bacteria name
- date
- name of the group you work in (FabTextile)
- name of the person
Step 5 :
Sterilize the area.
Poor some alcohol on the table, then place the camping fire next to the sterile area and turn it on. Then unscrew the bottle’s cap and sterilize the edge of the neck of the bottle on the fire.
Quickly open the petri dish and poor in a layer (a couple of mm) of nutrient agar
Let it rest until firm/cooled down
Prepare the Petri dishes - with the textiles
Prepare the petri dishes by writing all the information on the back (medium, bacteria name, date and person)
Poor some alcohol on the table and sterilyze area
Place the camping fire next to the sterile area and turn it on
Sterilyze the metal pincet/tweezer with some alcohol
Carefully open the disposable autoclave bag and take out the prepared textile using the pincet
Place it in the petri dish and close it
Unscrew the bottle’s cap and sterilize the edge of the neck of the bottle on the fire
Quickly open the petri dish and poor in a layer (a couple of mm) of nutrient broth over the textiles
Let it rest until firm/cooled down
Step 6 :
Inoculation :
Poor some alcohol on the table and sterilyze area
Place the camping fire next to the sterile area and turn it on
Take the metal inoculation loop and sterilize it by passing it onto the flame (if plastic skip the sterilizing)
With quick and carefull movements:
open slightly the cap of the dish with the bacteria
dip the still warm inoculation loop in the medium next to the bacteria (not on bacteria)
now swipe gently over the bacteria
trasfer bacteria on the new petri dish (or on the textile)
(TIP: always open both the petridishes on the flame/sterile side)
Now seal the petridish with some Parafilm tape
Now that petri dishes have been inoculated they need to be stored at around 26/30 degrees celsius in an incubator or similar.
Then you have to kill them.
Test :
Test on silk with : Gantheno Bacterium


+Test kombucha