Textile Scaffold
Mold in leather
A/ FILE ON SOFTWARE
1. From Make Human to CNC Milling Machine.
We first took a face from Make Human and used the CNC milling machine to create a 3D form in Polystyrene.
The make Human face has been cut on rhino with open surface. Surface / Plane / 3 points. Delete the part that is not needed.
the file should be save in STL.
_
NB : turn ON the milling machine before to turn ON the computer and upload the file.

2. File on Milling Machine
Open the file with a CAM software for CNC Milling machine to have it in G-code.
2.1 on the software you have the possibility to Orientate and size the model. [Top surface → Bottom]
2.2 It's better to change in millimeter the dimension. (Change just if you need.)
2.3 Material size
- Lenght (X)
- Larger (Y)
- Thickess (Z)

_
3.2 The tool adjustment parameters:
- its ask to enter the type of the bit. And Define which type of bit needed for example : round, squared. depends on the use.
in this case it's Ball nose.
We used two different bit, 6mm and 3mm for the big part and refine part.
- Then choose The diameter of the tool.
- The Roughing tool : 6mm
- The Finishing tool : 3mm
There is the Possibility to do all in one with a tool size in between.
_

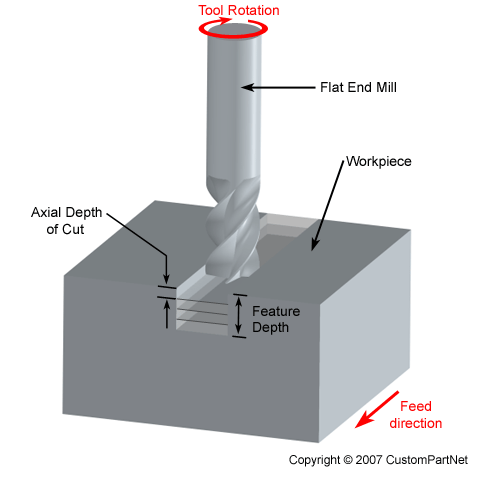
4.The cutting parameter
The distance that the cutting tool or workpiece advances during one revolution of the spindle and tool, measured in inches per revolution (IPR). In some operations the tool feeds into the workpiece and in others the workpiece feeds into the tool. For a multi-point tool, the cutting feed is also equal to the feed per tooth, measured in inches per tooth (IPT), multiplied by the number of teeth on the cutting tool.
- Pass depth :
Roughing tool : 4 mm
Finishing tool : 1 mm
- Stepover :
Roughing tool : 1.5 mm
Finishing tool : 0.3 mm
The smaller head is used to define more precisely angles and shapes in detail.
The cut time for any given operation is calculated by dividing the total cut length for that operation by the feed rate, which is the speed of the cutter relative to the workpiece.
_
5. Feeds and speeds
- Spindle Speed :–> Cutting speed : The speed of the workpiece surface relative to the edge of the cutting tool during a cut, measured in surface feet per minute (SFM).
Roughing tool : 14 000 r.p.m.
Finishing tool : 12 000 r.p.m.
–> Spindle speed : The rotational speed of the spindle and tool in revolutions per minute (RPM). The spindle speed is equal to the cutting speed divided by the circumference of the tool.
- Feed rate :
Roughing tool : 40.0
Finishing tool : 60.0
–> The speed of the cutting tool's movement relative to the workpiece as the tool makes a cut. The feed rate is measured in inches per minute (IPM) and is the product of the cutting feed (IPR) and the spindle speed (RPM).
- Plunge rate :
Roughing tool : 40.0
Finishing tool : 60.0
(–> mm/sec)
 _
_
6. It will calculate the estimate time.
B/ TECHNICAL ASPECT OF MILLING MACHINE
1. First steps ON/OFF.
- Turn on the red button clockwise (on the back of the room of the lab in Amsterdam if you go there one day.)
Press “K”to open a window to move the machine using the arrows.
2. Table preparation
- Use a vacuum to clean the platform.
- Screw a piece of wood underneath, if necessary, to have a flat board.
3. Tool
- Step 1
it is screwed with two wings. Unscrew and place the protection plastic down to be able to change the bit.
- Step 2
Use a adjustable wrench to turn the bit and change the tool.
- Step 3
Do Step 1 to place back the protection plastic.
4. Material milled
If using a polystyren material, place double tape on the back of the object to mill to make it stable.
5. Calibrate
A flat metal bar is already attached on the machine.
Place the bar on the object to mill, the machine will position itself until reaching the screw to find the level 0.
On the software:
Zero axes X ; Y on top of the window.
6. Useful Information
- In case of emergency press the Red button underneath.
- To pause, space bar.
- To stop, remove the key.


. We add shellac on top of the polystyrene to make it waterproof. Then vaseline.

3. We add the leather (should be placed in cold water for a couple of hours to make it malleable)
- We tried to mold it to the foam with the vacuum forming machine but this one wasn't working, the air was coming inside.


- We used a hermetic bag with a normal vacuum cleaner. we also try with a heated blower.

To make the leather stay, we attached it all around the mold with staples.
then we removed the leather :

Crystals growing
Each salts has a different way to grow on water.
salts used : Alumn (Piezoelectric crystal), Sea salt, Epson, Borax.
_
1. First step
mix salt in boiling water. Alumn needs to be added until it doesn't dissolve anymore.
_
2. Second step add color (or not)
we used acrylics, china ink and food color. the last two works better.

boiling water 25ml + Epson 2spoon + red acrylic
3. Add materials
like hair stick thread or fabric to be able for the crystals to get attached. Suspends them with a wood stick on top of the glass.
wait couple of minutes (circa 30min) and remove the stick.


→ Epson 3 spoon + boiling water 25ml + acrylic (drop)


→ Borax 3 spoon + green color food + boiling water 25ml


→ Boiling water 25ml + china ink + alumn (until it doesn't disolve)

Alumn + hot water + fabric (Lycra and 3D print filament from the computational assignments)
the other experiments have disappeared in the lab.