BioDyes, BioPlastics and Bacteria Dyeing
Natural dyeing
Work in Group
Wednesday, October 18th we have participated in the dyeing of natural fibers, animal and vegetal, using different processes.
It is necessary to be equipped with a pan (no culinary use), a hot plate, glass jars, a net, and plastic containers.
_
Fibers :
- Wool
- Silk
- Linen
- Twisted Cotton
- hemp

devided into groups
- 5 groups of 6 wool threads
- 5 x 6 silk
- 5 x 6 linen
- 5 groups of cotton threads
_
Mordants :
used to improve the fastness of the dye and give a different color according to the time and the quantity used.
- Copper
- Soda
- Alumn
- Iron

_
Colors :
- Alkanet
- Annatto
- Madder
- Hibiscus

_
Step 1
Better to boiled vegetables fibers before in water and sodium carbonate during 25 / 30 minutes to remove the oil.
The animal fibers can't be boiled. (80C° max.)
a) In 5 different Pans :
- Water + nothing
- Water + Copper (Half water ; half vinegar ; copper)
- Water + Soda (two spoon of soda, boil for 30 min) used to raise the pH
- Water + Alum (for 50g of fiber add 7,5g of Alum ; 15%)
- water + Iron (half water ; half vinegar + Iron) better on vegetable fibers
For animal fiber, possibility to add 8% of crème de tartre.
b) Add one group of fibers in each pan.
c) Remove the fabric.

In order to remember which fiber has been treated in which mordant we used a knots system.
0 knot : Nothing
2 knots : Alum
3 knots : Copper
4 knots : Iron
d) Rinse the pan.
some mordants have been preserved in glass jars.
_
Step 2
a) Add the organic compounds for dye.

b) Add the fibers in one pan for one pigment.
The fibers have been emerged with the pigment for one hour.
c) remove and clean briefly the fibers.
_
Step 3
a) Modifiers
Same as step 1.
Used to change the shade and color of the fibers.
Can use the same substance.
_
Step 4
a) Classification

_

_

BioPlastics
We worked on the process of making plastic with natural component. The Bioplastic is not resistant as proper plastic and melt again with hot water or hot temperature.
We use Glycerin and Gelatin with water.
Possibility to add colors and soap for a foam texture or other component to change the property or/and color.
_
1. Basic Mixture with Natural dye
- Hibiscus water from dyeing : 60ML
- Gelatin : 12g
- Glycerine : 3ML

the texture is still soft and fluffy.

the texture is hard and curvy.
Maybe leave a flat object on top to keep its original shape.
_
2. mixture with Iron and Gold
- Water : 60ml
- Gelatin : 7g
- Glycerine : 3ml
- Iron : 1ml
- Gold acrylic

The Iron gives this rusty color, the gold add matter.
3. Molds for BioPlastics :
a) First mold

Illustrator file from the previous module.
Laser cut in Plexiglas
thickness 5mm
- Power : 90
- speed : 10
- corners : 30

Issue
some pieces are not well cut.
. A lower speed / higher power melts the plexiglas and sticks on the edges. Flames remain few seconds even when the laser stops.
. A higher speed / lower power does not cut the material well.
. The circle on illustrator are not closed so it does not makes the corner's cut efficient.
b) Second mold

First mold copy x3.
select one group [Object > Envelope Distort > Make With Mesh]
Same for the other groups.
intersecting shapes.
Add forms to fill the gaps.
Laser cut in Plexiglas
thickness 5mm
- Power : 100
- speed : 14
- corners : 30
issue
some pieces are not well cut.
Same problem as the previous form.
_
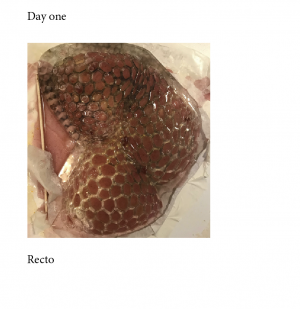
4. Remains of Bioplastics - Tests with molds

_
a) remains of bioplastics n°1 with mold 1
- Remains of bioplastics n°1 : 28g
- water : 60ml
- glycerine : 3ml
Pour in a mold.

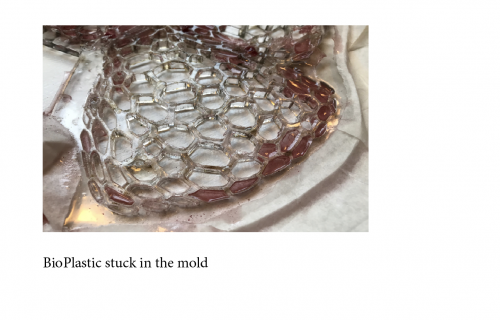
the substance goes underneath. maybe try with tape or plexiglass with holding clips.

The bioPlastic is not completely dry yet.
It separates in two when it is taken out of the mold.
_
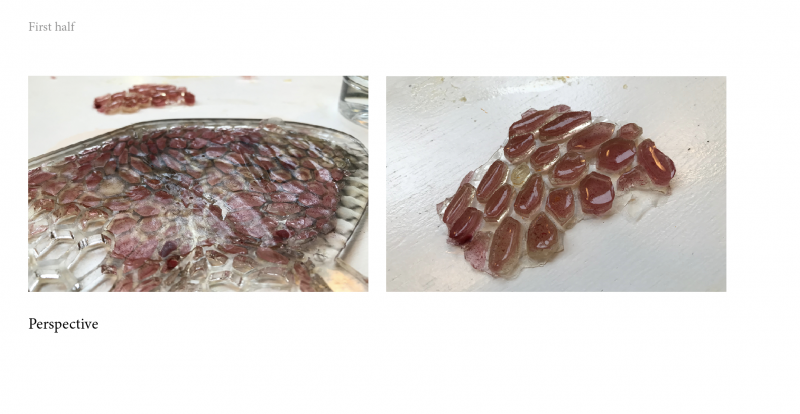
b) remains of bioplastics n°2 with the negative of the mold
- 47g Bioplastic n°2
- water 60ml
- glycerine 6ml

Pour on the rest of the pieces from the mold 1.

Pour on tape to keep the substance.
_

the form keep the shape of the tape and gives a matte texture.
Maybe pour a second layer on top of the plexiglass pieces, the bioPlastic is too thin, it will makes it fragile.

It is not completely dry.
_
c) mixture for two tests
1/ first mix with pieces of mold
- Water 60ml
- Gelatin 12g
- Glycerine 5ml
separate in two before to pour.
One for small pieces :

Pour on the tape.

It is not dry yet.

2/ second mix with the mold n°2 and bioplastic remains n°3
And with the other part of Bioplastic, add :
- Bioplastics remains n°3
- Water 60ml
- Glycerine 3ml
- Copper 3ml
Day two
the texture like before splits in two maybe because it's not completely dry yet and the mixture is going underneath.
The first part is still on the mold, too fragile.
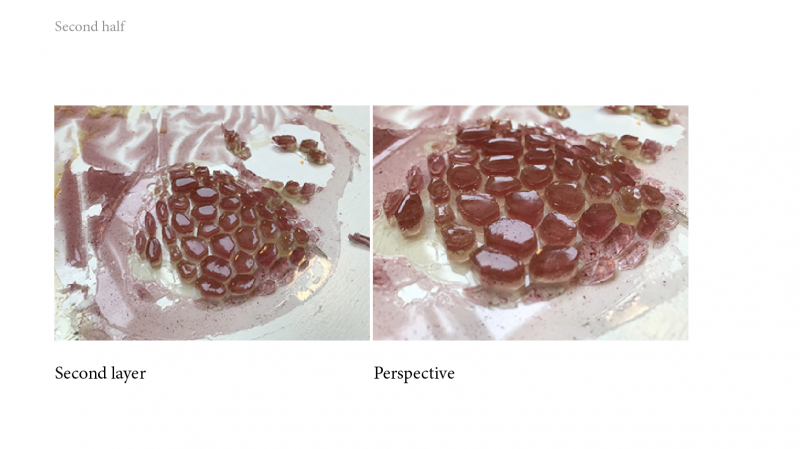
Some part when out of the mold. The structure is really fragile. difficult to have a uniform shape.
d) mixture with Agar
- Water 300ml
- Glycerine 20ml
- Agar 12g
divided for another test and also with another student.
Used again the pieces of mold but pouring first the mixture, then adding the pieces.

the texture start to dry and brake when the last pieces have been added.


The pieces has been removed the second day. maybe its better to remove some minutes after pouring.
e) mixture with egg shell and Agar
- Water 300ml
- Glycerine 20ml
- Agar 12g
- Egg shell

with Agar the texture is transparent. the result with the egg shell is not as expected. (esthetic)
Bacteria Dyeing
In the bio Lab we have grown the bacteria Janthinobacterium lividum to extract his colour and use it to dye fabric.
the bacteria needs to be fed with LB Broth (Lennox) and Gelose nutritive a 2% / nutrient agar at 2%.
And placed in an incubator at 25C°.

(impossible to turn the image in this moment don't know why, sorry for this)


We mixed the nutriment in a small bottle that we put in boiling water to sterilize it.
The containers (petri) and all the tools have been immerse in boiling water for 10min.

We used living bacteria from other cultures to grow new ones.
_
There is two ways to dye fabric.
1. To let the bacteria grow on the fabric in the petri.
So we add the fabric, the food and on top the bacteria.
To extract the bacteria we use an Inoculating loop (is a tool usually made of platinium or nichrome wire in which the tip forms a small loop with a diameter of about 5 mm, and is used to smear, streak, or take an inoculum from, a culture of micro-organisms.)
Then leave for 3 days in the incubator.


After 3 days the fabric has been colored by the bacteria.

Place the fabric in a plastic bag and sterilize it in boiling water.


_
2. To collect the color from the bacteria
Like the first technique let grow the bacteria in the petri with only food, no fabric.

Leave it for 3 days in the incubator.

the bacteria have multiplied and left pigments of colors.
Then take the color and add water.

place the tube in boiling water.