Grasshoper Tutorial
Useful Basic Grasshoper commands:
Vector→Grid: a grid is vital to begin one's pattern
Surface→freeform→boundary surface: this is necessary to create a surface of the object created, always important to have it closed, so that it can be 3D printed
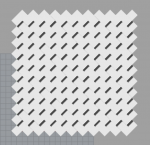
In my project, I created a a grid with squared in it, and randomized their height for every second column. The theoretically gave the appearance of a different colors, because the thinness of the PLA would allow some of the textile's colors to pass through.


Grasshoper and Rhino Usage
Firstly, Rhino was opened, and grasshoper was used as a plug in. As with most new softwares, it was important to play around with the different buttons and what it can do. It was complicated since grasshoper uses images for its tasks, and tutorials didn't start as basic that we needed, ont he internet. However, we were given a tutorial with the very basic which helped a lot with understand this new 'language'.
I wanted to play with colour, and with the different heights of the 3D printed structures, so that you can peek at the colour of the material, but with various gradients.
3D-Printed Model
The process: Firstly, to do the model via the Grasshoper plug-in of Rhino Secondly, select what was needed to 3D printed and export it as a stl file Thirdly, import the file into Cura Fourth, change the settings of the 3D printer in order to accomodate the printer and the product type Lastly, add this to a USB
For the printer: take away and add in the material after inserting the USB, click on the file needed It is useful to look after the printer, to make sure that everything is under control.


Using Different Materials For the 3-D Printed Model
As one can see, with the conductive material, there were immediate burns with the high temperature of the nozzle

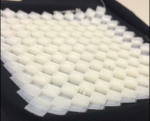
I experimented with other two materials, to see how it would attach, and with various heights. The height differences were simple to change on grasshoper, since it is a parametric function. The settings were the same, the only settings changed: 30 mm/s print speed; infill density 40% This was to increase the speed to make the material. It took around 2 hours for each, which was less than the 6 hour ones previoulsy because I made the area smaller.
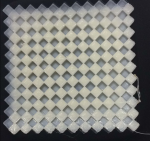
With the black screen, one is able to see the colour, since the height was also lowered.
Something that was also interesting is that the 3D printed model (with elastic PLA), was able to be removed fairly easily. The back surface was very smooth, which could be seen as more aesthetically-pleasing.


With the other material I wanted to see the change when I stretched the fabric, and then when the 3D printing was finished, I unclipped the fabric. The end result

