Week 4: Bio Dyes and Biofabrics / Cecilia Raspanti

CLASS
This week, Cecilia open our eyes to a new world of new more innovative and sustainable textile materials and ways to dye them, as a response of the negative impacts traditional techniques of fabricating textiles are having on the environment and therefore on the people working on it.
ASSIGNMENT
a) GROUP ASSIGNMENT: Make at least 2 kind of dyes and create 2 materials.
1. NATURAL DYEING
WHAT
Dye natural fibers using mordants, natural pigments and modifiers.

STEPS
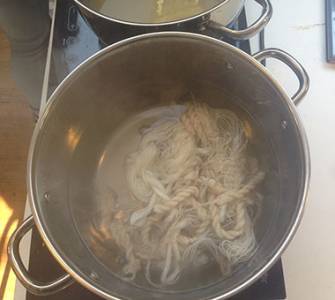
1) SELECT NATURAL FIBERS: Animal (Wool and Silk) and Vegetal (Cotton, Linen and Hemp)
2) WEIGHT DRY FIBERS: Important for the proportions
3) CLEAN FIBERS: Remove the oil with sodium carbonate and hot water
4) USE MORDANTS OF CHOICE: In big pots with water on a heather / Never boil animal fibers! (80º max)
5) USE PIGMENTS OF CHOICE: Clean the fibers from the mordants and put on another pot with the pigments and water. Safe water with pigments.
5) USE MODIFIERS OF CHOICE: Clean the fibers from the pigments and put on another pot with the modifiers.
6) LET DRY AND ORGANIZE THE RESULTS
*For more info follow the recipes for each pigment and mordant


RESULTS


LEARN/PROBLEMS:
- The PH of the water can change the colors, is important to test it before and you can change it with soda.
- Important to create a system to categorize the results (knots, labels, colors, etc)
- The final color can vary a lot depending on the fiber, silk is usually brighter.
2. BACTERIA DYEING
WHAT
Dye natural fabrics by letting the bacteria “janthinobacterium lividum” grow on them.
Bacteria + Food (LB Broth, 25 gr x LT) + Incubator (24º)
STEPS
1. USE LIVE BACTERIA: Is important to have live bacteria on petris growing on advance.
2.STERILIZE EVERYTHING: Put everything you want to use on a pressure cooker with water. Let it boil for 15 min. (Fabrics, petris, food)
3. PUT BACTERIA ON THE FABRIC: Using an inoculation loop (with heat and alcohol), remove some bacteria from the original petri dish and put them on a petri dish with the fabric and food (LB Broth).
4. LET THE BACTERIA GROW: Put the petri dish with the fabric on the incubator and let it stay for 3 days.
5. TAKE OUT THE FABRIC: After the 3 days, remove the fabric from the petris and put it on the pressure cooker to kill the bacteria. Clean with water and it`s ready to use.


RESULTS

LEARN/PROBLEMS
- You can easily kill the bacteria if you don´t sterilize everything properly.
- Is important to make more petri dish with bacteria every 3 days, so they don´t die.
- For growing on a petri dish with textiles: LB Broth is the food. For growing on the petri with nothing else: Agar is the food.
- Is possible to take the pigments out of the petri dish and mish it with alcohol to dye bigger pieces of fabric.
3. KOMBUCHA
WHAT/STEPS
Learn how to grow kombucha and take some samples to dry them. We didn´t make kombucha from cero but we took some of the allready growing and put them to dry. It`s really smelly. It took about 7 days to get fully dry. We also put some food pigments on one sample.


4. BIOPLASTICS
WHAT
Create bioplastics and experiment using different kinds of mixes, colors, ways to mold, etc.
Basic recipe: Gelatine (plasticizer) + Glycerol (make it soft) + Water .
The different proportions will change the
consistency of the material, turning it more hard, soft, flexible, etc.
STEPS
1. DEFINE WHAT KIND OF MATERIAL YOU WANT: Depending on this, you choose the proportions of ingredients.
2. WEIGHT: Weight each ingredient
3. MIX ON THE HEAT: Mix all the ingredients on a hot pot for around 3 min.
4. PUR THE MIX: You can use a mold made of acrylic o wood.
5. LET IT DRY: Let the mold dry, you can touch it after 1 hour, depending on the mix (more glicerine or more water = more time to dry), and turn it to the other side.
6. CHANGE FORM: If you want to change the form by moving it, don´t wait until is fully dry. When it`s fully dry, you can laser cut it.


RESULTS
We try:
- Put soap: It make it softer with a sponge texture
- Adding textiles, acrylic, flowers and threads : Great appearance and change of the structure
- Ussing agar insteat of gelatine: It works and is more transparent
- Mixing 2 layers of colors
- Different thicknesses
- Laser cut: It works really well

Cecilia Raspanti / Sofia Guridi / Fanny Trivero


Fanny Trivero / Sofia Guridi / Fanny Trivero


b) PERSONAL EXPERIMENTS
WHAT
I wanted to experiment with form and how can you create 3d forms with bioplastic, without using 3d molds, and taking advantage of the shrinking.
STEPS
1. CHOOSE THE RIGHT MIX: For this, I use a low glycerin mix.
2. COOK
3. PUR THE MIX: Put the mix of a flat surface with the shape you want
4. ADD THREADS: Add threads to the mix in different shapes
5. MOVE THE PIECE: After 4 hour apróx, take the piece, move it and place it wherever you want on a 3d way.
6. WAIT UNTIL IS DRY
RESULTS
A.


B.


C.


- The bioplastic helps to gave shape to a piece of fabric without stitches or glue.