For the final project, I will work together with Laura and Pia.
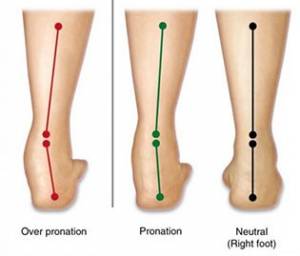
As already mentioned in our video, we want to create a sensor embedded sole, which helps to cure overpronation.
What it is about?
The sensor will be imbedded into the sole and will detect the amount of pressure that the foot is experiencing. Once the pressure threshold has been reached, the sensor will give a feedback in the form of a vibration. This which will aid the wearer in correcting his or her gait.
Why are we doing this?
Severe cases of overpronation and extreme inward rolling can lead to following health problems and complaints: shin splints, plantar fasciitis, achilles tendonitis and bunions - just to mention some of them.
What is the aim of our sensor embedded sole and how will the user benefi from our product?
The aim is to create a sole which will remind the user to walk correctly and in this way hopefully correct his or her walking style if the case is not too severe. That is also the reason why we concentrate on the target group of children because in this time period the worst cases can be prevented.
Which materials are we going to use?
- work load sensor or a DIY pressure sensor
- EcoFlex
- flexible or sturdy 3D-print
- ATtiny
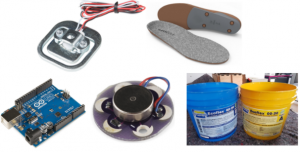
- Arduino
- vibration buzzer
- Fusion360
- Rhinoceros
- Cura
How will we proceed?
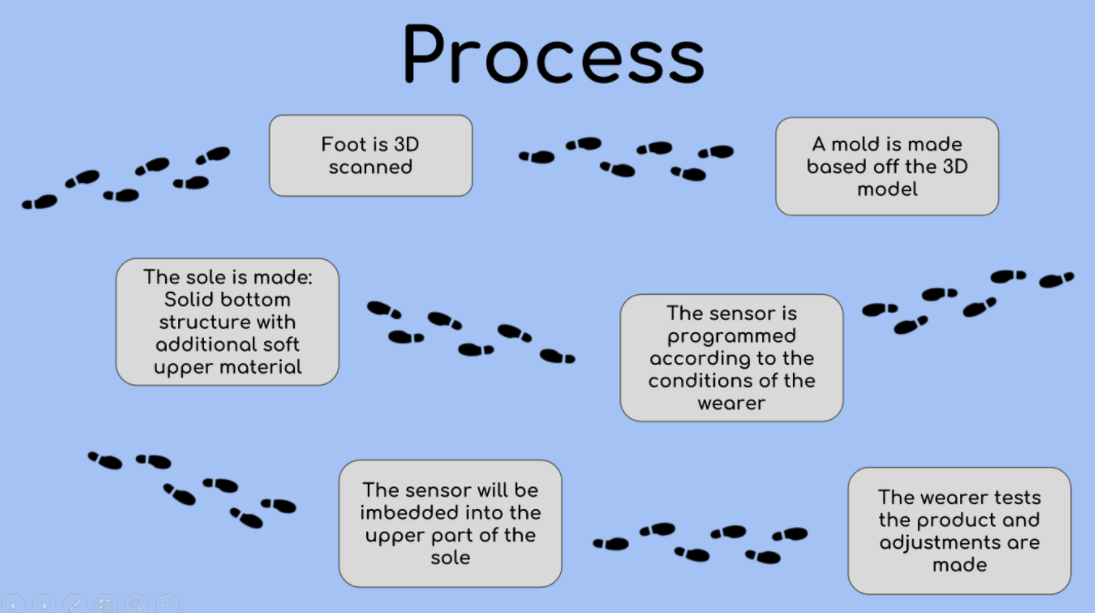
Our process can be divided in several steps.
Step 1: Obtaining wearer's data
This process will start with a 3D-scan of the wearer's affected foot because we want to determine the exact topography and by reference of this create a completely adapted sole. While this process step, the pressure threshold of the wearer will be determined, so that if can be added into the software later on.
Step 2: Sole and sensor development
An essential part of treating overpronation is providing enough support to the affected foot. Therefore, we will add the necessary support to the sole. The bottom of the sole has to be rigid as well as flexible in order to support the foot, but also keep up the usual mobility. Therefore, we want to use a flexible 3D-printer filament, which will fulfill these requirements. Wearing comfort is another important and deciding aspect, which has to be noted in creating a sole. Based on that, our final product needs to boast following properties: stability, flexibility, comfort and skin tolerance. Keeping this in mind, we decided to create an upper layer out of EcoFlex. The necessary sensor-circuit is based on an input- and output-system. The input is defined by the pressure threshold determined before, thus the overpronated gait will lead to a higher pressure on the base of the big toe and this will lead to our needed input. The output is defined as a vibration buzzer, which will alert the wearer. Therefore, a work load sensor or a DIY pressure sensor has to be calibrated.
Step 3: Programming the code
As a separate process, we will do the software, thus the Arduino program code. For this, we must define the input and output, the used connection pins, the pressure threshold as well as an if-statement - just to give you a first impression of the code's content.
Step 4: Creating prototype and doing modifications
The needed assembly consists of merging both parts, the 3D-printed bottom and the upper EcoFlex-layer, together. Here it is important to ensure a homogeneous and even sole, which will not lead to any complaints concerning the wearing comfort of the wearer. For the testing, the wearer must put the sole into his or her shoe and walk around with it. Important for this process is, that the wearer gives an honest feedback and therefore a basis for modifications on hard- and software, which will be done in further processes. With this step, we will also have a feedback for our vibration mechanism.