This week we started with an introduction given by Adriana, who explained us how Lilly developed her own infelt. Then we had our practical part in the lab. Therefore, we splitted the assignment in two parts. This splitting was done because to concentrate on the one hand on the pneumatic wrist bracelet and on the other hand on the soft gripper. For the first part we needed following materials: Thermo Transfer, backing paper, the machine to use the thermo transfer, scissors and the heating press. Then we did the following steps.
First, we downloaded the given template for the pneumatic wrist bracelet from Adriana. Then, we had to download the software “Silhouette Studio”and opened it. In this software, we worked on the template by changing some settings such as scaling and mirroring in order to cut the Thermo Transfer correctly. Then we exported the data as DXF file in order to cut the template within the Thermo Transfer. Cutting the shape of the bracelet twice of the Thermo Transfer material and once of backing paper was our next step. You need twice the thermo transfer material for the upper and lower surface, and the backing paper is for the middle area. After cutting the bracelet, we paste the shiny side of the Thermo Transfer to the baking paper. A small hint: when the cuttings on the machine are not thick enough, then you have to change this. Optimal solution for this used material are 3mm. After cutting the three piecesand pasting them together, we put them into a heating press by 150° C until the materials were welded together. Then you have to put a pipe into your bracelet and when you add air to it, it will blow up and decrease the mobility of your wrist.
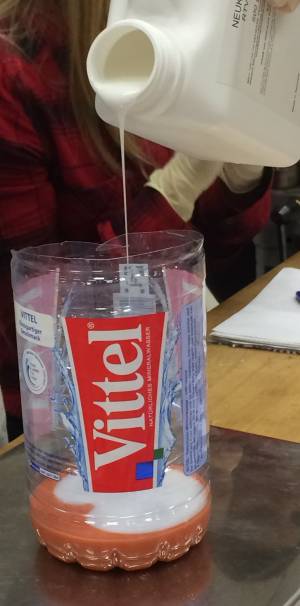
After finishing the first practical part, we started the second one. For this, we needed Ecoflex part A and B, Neokasil part A and B, release spray, scale, oven, 3D molded form, paint brush and a plastic bottle. The following steps were done.
We mixed Ecoflex A together with Ecoflex B and Neokasil A togethervwith Neokasil B. Herefore, it is really important to consider the rule of using 50:50 of each. Because of that, we decided to mix 50 grams of each ingredient and that is why we needed the scale. When you work with Neukasil, you have to put release spray onto your mold to remove this better. Thid step is not necessary when you use Ecoflex. Hint: There you just have to make sure, that the Ecoflex has enough time to dry! After preparing your mold, you can fill it with silicon (Neukasil or Ecoflex). If you want to, you can also vary with colours to make the silicon form more interesting, but in this case you also have to increase the drying time of the silicone. Putting the model into the oven, which should have a temperature of 70°C, it should stay there for 15 minutes. After getting the forms out of the oven, you have to let it cool down and then you paste both layers together - the second layer is just some of the silicone mixture rolled out on a glass plate to have something like a cap for the mold. To avoid the possibility of bursting out, you can add some of the silicone-mixture at the borders.
Because of visiting the Hochschule Rhein Waal in Kleve on Thursday, I designed my mould at the weekend. To create the basic shape, I used the software Rhino, and for turning my 2D-model into a 3D one I used Fusion 360. I needed a long time for creating my mould because I had some issues with the software, but after finishing the mould, I decided to design also a cap for my mould because I had fun to work with the software and see what I am able to do with it. I finished my work at the weekend, with preparing my objects for the 3D printer with the software “Cura”. On Monday, I printed my mould and my cap. I did not finished my assignment yet, but I will continue with it this week!
Here are some pictorial impressions of my week :)


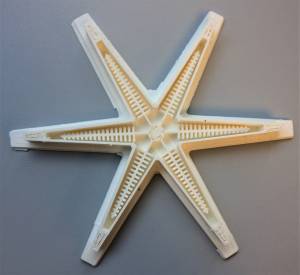
Unfortunately, my star out of Ecoflex broke, while pulling it out of my mold. My suggestion was that the air ducts has a too small distance between each other. Therefore, I quickly changed my design of the mold and reprinted it. Out of luck, my mold disappeared somehow in our lab, so I had to reprint it again. This time, the Ecoflex broke again while trying to pull it out of the mold. Now, I suggested that the problems are the star-legs: I designed them to be smaller at the end than at the beginning. Therefore, I designed a new mold with legs same sized. I will reprint my mold, fill it again with Ecoflex and now it will hopefully work.


After this break of the silicone, I redesigned my mold again in Rhino.
I printed my new mold with the Ultimaker 2+ with a nozzle of 0.6mm and therefore it needed roundabout 4 hours to print. After the printing process, I filled it with Ecoflex-mixture, put it into the oven and let it cool down two days. And it worked perfectly!

Because of that, I decided to fill my second mold again with Ecoflex and let the Ecoflex also for some days in it - I am curious about if if will work this time. After finishing filling my old mold, I prepared the “Ecoflex-plate” for my “Ecoflex-star” - therefore, I put a thin layer Ecoflex onto the plate - in this case the Ecoflex works like a bonding agent - and put my “Ecoflex-star” on it. Then I added some Ecoflex at the borders and put both, my “Ecoflex-star” and my old mold into the oven.