Week 11 l Soft robotics
5.12.2017 Global meeting l Instructor Lily Chambers
This week we focused on soft bodied robots which have similarities and performance characteristics similar to living organisms or the human body. Soft-robotics are based in Bio-inspired design or biomimicry and have applications in wearables, rehabilitation prosthetics, surgical robots, rescuing and others. We experimented on the fabrication of soft actuators and grippers.
6. & 7.12.2017 l FabLab Session
Our Assigment was devided in three steps
1. Basic: Pneumatic brace
2. Intermediate: Pneumatic gripper
3. Advanced: Controlled actuation, varied materials…
( Pneumatic is the field of engineering that makes use of gas or pressurized air to perform mechanical work)
1. Basic: Pneumatic wrist brace
We used the template (dxf. file) of the wrist brace and edited it in the program “ Silhouette Studio” to cut it later on with the vinyl cutter.
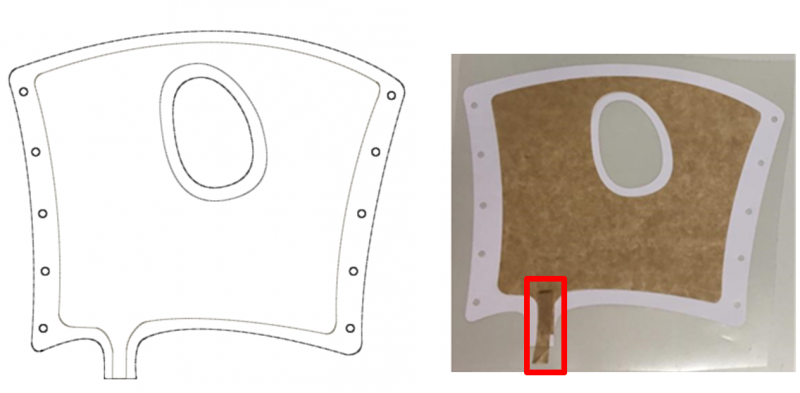
I did my preparatory in Rhino, I dissembled the template in the single lines and scaled it in a proper size. To cut the thermo transfer material I just needed the outer lines inclusive the wholes. I mirrored it to get two parts of the wrist brace which is needed to enable the inflation at the end. We past the vinyl material on the cutting support (self-adhesive folie) with the dull side up. We adjusted the cutting settings for the vinyl material in Silhouette and started the cutting process.
Furthermore we used the inner lines of the wrist brace to cut baking paper, here we needed only one part. It is really important to have a “leg” which ends on the same area where the thermo transfer material ends. That will be later the position where the pipe will be insert
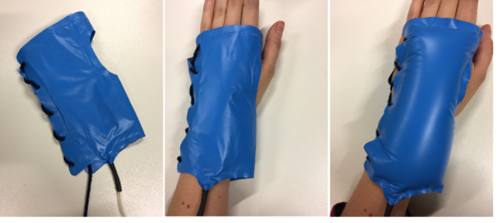
Finally, we had one layer of the vinyl part, the baking paper in the middle and the second vinyl part. Important is, that the dull sides of the vinyl part are laying together because they will melt when the whole wrist brace is heated up in the heat press at 150° degree for (approximately 15 seconds). After the material is cooled down you can insert a pipe and fix it with a heat pistol it somehow looks like a flambe burner to provide an air tight seal. Connect the wholes with a thread (we used wool) to make the brace wearable, add air and it will decrease the mobility of your wrist.
2. Intermediate: Pneumatic gripper
For the pneumatic gripper we used an existing 3D printed mold. For the mass of the gripper we mixed in a relation of 1:1 the silicon rubber liquids Ecoflex A with Ecoflex B together and Neokasil A togethervwith Neokasil B. While working with Neokasil it is recommended to use release spray for your mold to remove it later on more easily. This step is not necessary if Ecoflex is used but it has to make sure that the Econflex has enough time to dry.
After preparing the mold you can fill it with one of the two mixtures. Either Econflex mixture or Neokasil mixture. We did both versions. Be aware that the mold is properly filled. Prepare a layer to close the gripper at the end. Therefore a plate is sufficient were the liquid can be spread according to the size of the gripper´s surface.

Adding colors into the silicon is possible but it has to be considered that it will increase the drying time.
After we filled our molds we put them into the oven at a temperature of 70°C for 15 minutes. Afterwards the molds had to cool down before the second layer we already prepare could be paste. To avoid the possibility of bursting out, some of the silicone-mixture can be added to increase the stability of the connection.
To inflate the gripper we insert a canula and pumped really carefully air into the gripper. It inflated and the second part was completed successfully.
3. Advanced: Controlled actuation, varied materials
Due to time issues we had no time to experimented a lot in the advanced field of controlled actuation. The basis for our controlled actuation was the gripper we produced beforehand. We connected the tube to an DC pump motor. We connected the pump motor to an Arduino and automated the inflating process.
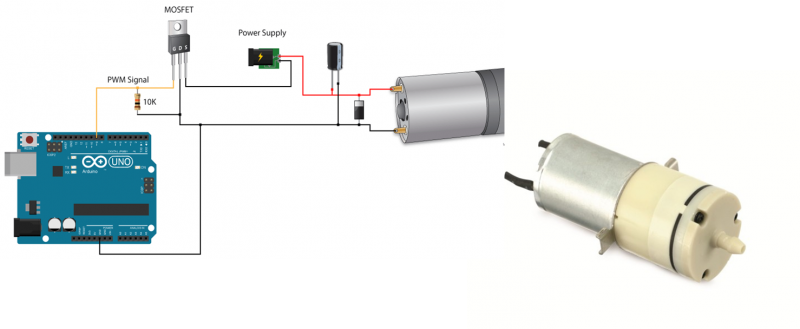 (images: presentation Lily Chambers, Assignment softroboticstoolkit:Controlling the sensors with DC pump motors)
Assignment
In regard to my final project is chose to create a pneumatic insole. Like described before I did mz sketch in Rhino, edited in Silhouette and started the cutting and melting process.
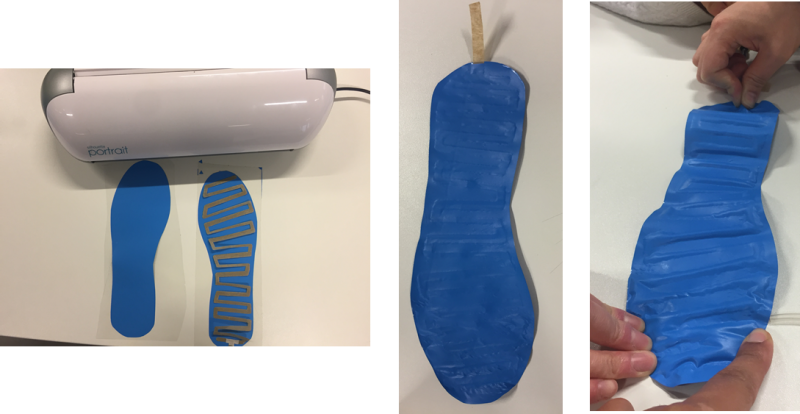
Find a clip of the working pneumatic insole