Week 8 l Open source hardware: from fibers to fabric
Global instructors: Marc Canet & Varvara Guljajeva
In this week we explored machines in the field of textiles and investigated the potential of digital fabrication and open source technologies.
Assignment:
Create a machine or hack an existing machine that converts fibers into fabrics
15.11.2017 l FabLab Session
After our lecture we had a tutorial which introduced us into the work with different motors.


(Photo taken from a presentation by Adriana Cabrera)
We got a little exercise where we had to connect a servo motor with two buttons, you can see the results in the following clip
16.11.2017 l FabLab Session
After the introduction into different motors and different fabric manufacturing technologies (woven, knitted, non-woven and braided) it was our turn to collect ideas for the weekly assignment and work on it.
We worked in groups.
Me and my team mate have been inspired by Wendy Andreu and her Project Regen (find more information on her homepage) which was presented in the global meeting.
![]()
Wendy Andreu produces fashion and accessories without seams, cuts, or assembly. She coils a white cotton cord around a steel frame. Afterwards the thread is partially coated with black latex which enables the lines to weld among each other which leads to a waterproof membrane. Thanks to this process, she innovates the creation of a waterproof textile.
We watched the following video where the creation process is presented in detail and we could see, that the designer controlled and operate the plate and the coiling of the cotton manually.

We wanted to automate the rotation of the plate where the steel frame is fixed on and as well the coiling of the cotton.
First we wanted to integrate two stepper motors, one for the rotation and one for the movement of the cotton along the y-axis. After some discussion with different person a professor of the field engineering stressed the point that we could do both movement by using only one motor because the rotation force of the plate where a holder for the cotton thread is fixed could be transferred via a gear to the main plate (where the steel frame is fixed). Due to the threaded rod the rotation and weight will lead to a movement on the y-axis.

20.11.2017 l FabLab Session
We started to construct the single components. We lasercut a plate were we included a nut to ensure a smoothly rotation on the threaded rod. Further more we glued a tooth belt around the plate to transfer the force to the second plate. Further components like screws, nuts, threaded rods and gears were parts of a prior RepRap ( Replicating Rapid-prototyper) which is a kit to build a 3D printer.

We also had to program the stepper motor therefore we used following description.

We used the stepper driver board. The code could be found here.

Prototype:
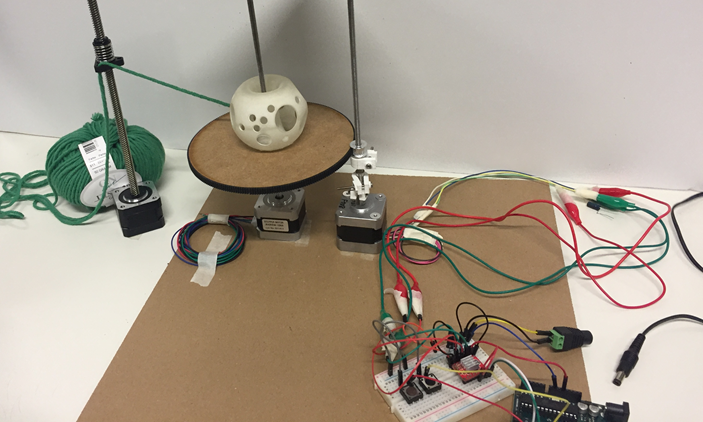 Short description from left to right:
The first stepper motor is not connected, we only used the black holder as a guide arm for the rope. The stepper motor in the middle is not connected either but it carries the main plate where the frame is fixed. Due to time issues we used a already existed form in this picture a 3D printed figure which is not really a proper frame because the rope can not be really fixed on the round surface. Later we used a figure with a reeded surface which worked much better. The stepper motor on the right is connected to to the Arduino (Stepper Driver Board, Bread Board and power supply). It carries the gear which transfers the rotation to the main plate.
Bill of Material:
- 1 Stepper motor
- MDF 5 mm
- drivebelt M2
- gear M2
- screws, nuts, threaded and rods were parts of a prior RepRap
- Arduino
- Breadboard
- Wires
- Stepper driver board
See the machine performing in the following clip.