WEEK 11 | 05.12.17
Soft Robotics
Lily Chambers gave the lecture this week. She introduced us to the soft robotics field by explaining some of the applications in medicine, research, education, wearables and so on. Furthermore, she encouraged us to replicate some of the basic examples explained step by step in https://sofroboticstoolkit.com
The basics
For a better understanding of this topic, I made some research and I found a good explanation about this field Here
The first approach to this field was through the silicone usage for making molds which are very useful when replicating any project.
Projects Inspired me:
Personally, I liked some of these soft robotics projects:
Basic:
https://softroboticstoolkit.com/resources-for-educators/pneuwrist-brace
Advanced:
https://softroboticstoolkit.com/soft-barrier
https://softroboticstoolkit.com/edible-actuators
Pneunets testing:
https://softroboticstoolkit.com/book/pneunets-testing
The challenge for this week goes from basic to advanced level. The student will choose among making a Pneumatic wrist brace, Soft Gripper or Pneumatic digitally controlled system to replicate it based on their knowledge.
Application 01 | Pneumatic testing
For this exercise, I wanted to create airbags just to see the pneumatics behavior and based on the results I could decide using this technique in my final project as testing patterns for the reshapable bra.
Materials
- Silicone 20A
- Activator Liquid for silicone
- The mold
- Air bomb DIY
- Container to make the mixture and a tool for blending
- Gloves to protect your hands
Electronics
- Microcontroller: Lilypad
- Leds
- Litium battery 3.7v
- Cables
The process
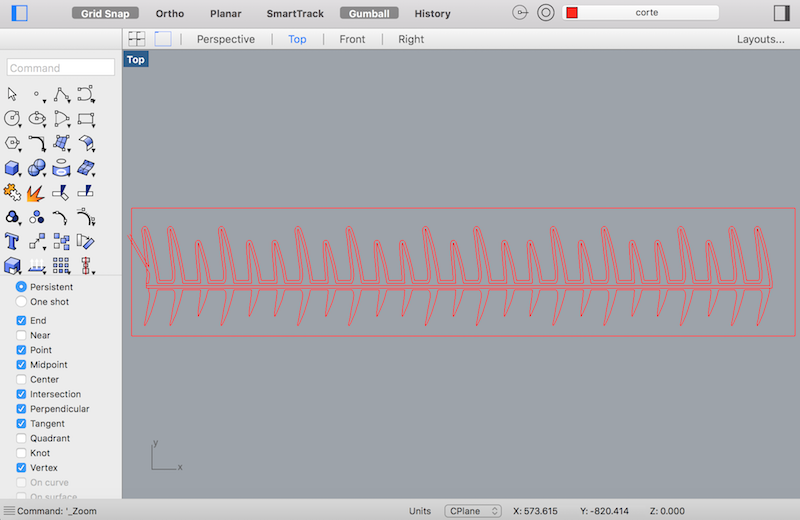
1. Make the 2D model of the airbags.
2. Design the mold. In this case, I decided for using the laser cutter as a tool to obtain the molds for the silicone.
3. Built the mold with the cut pieces and have it ready to put the silicone.
4. Prepare the silicone mixture in the required proportion described in the silicone bottle. In this case, the proportion of the Silicone 30 is 3 ml of the activator liquid each 100ml of silicone.
5. Spread the silicone preparation into the mold and let it dry for 30 minutes.
6. Get off the mold and prepare the next mold for the top piece to cover the current mold.
7. Put the first mold on the lid while it is not completely dry and let it dry for 20 minutes.
8. Finally, take off the complete mold and cut it with a scissor or cutter in the shape of your desire.


The result
1. Test your mold by injecting air on it with different pressure to see its behavior.
2. If you find some air leaks apply silicone to cover the gap.
3. Test it again and that’s it!
Video: https://vimeo.com/246268487
Application 02 | Pneumatic Bending - Soft Flipper
For this exercise, I wanted to take advantage of not only the silicone flexibility but also the electronics I can put inside the piece to make it interactive. This piece was thought of performers usage.
Reference
I found this information and took it as a reference to consider all the measures and details in my soft flipper design.
https://softroboticstoolkit.com/resources-for-educators/soft-gripper
Inspiration
I was inspired by the seahorse and its shape to create this piece. Also, the light that some of the sea animals have in the deep ocean.


The process
1. Make the 2D model of the airbags.
2. Design the mold. In this case, I decided for using the laser cutter as a tool to obtain the molds for the silicone.
3. Built the mold with the cut pieces and have it ready to put the silicone.
4. Prepare the silicone mixture in the required proportion described in the silicone bottle. In this case, the proportion of the Silicone 30 is 3 ml of the activator liquid each 100ml of silicone.
5. Spread the silicone preparation into the mold and let it dry for 30 minutes.
6. Get off the mold and prepare the next mold for the top piece to cover the current mold.
7. Put the first mold on the lid while it is not completely dry and let it dry for 20 minutes.
8. Take off the complete mold and cut it with a scissor or cutter in the shape of your desire.
Finally
9. Test your mold by injecting air on it with different pressure to see its behavior.
10. If you find some air leaks apply silicone to cover the gap.
11. Test it again and that’s it!
Design
Electronic schematic

The Piece


Fabrication & Results
Look at this video to see the fabrication process and the performance created with the result of this soft robotics application.
Files
Design: Programming:
https://drive.google.com/open?id=1C22gOQit7DaPPl37M8dmxoI1wZK07E5t
Coding:
int randNumber; variable que almacena el valor aleatorio int led = 10; define led como 10
void setup() {
pinMode(led,OUTPUT);
}   // no es necesario configurar nada
void loop() {
for(int i=0;i<250;i++)
{
  analogWrite(led,i);
  delay(10);
}
for(int i=250;i>0;i--)
{
  analogWrite(led,i);
  delay(10);
}
for(int i=0;i<10;i++)
{
  digitalWrite(led,HIGH);
  delay(80);
  digitalWrite(led,!HIGH);
  delay(80);
}
for(int i=0;i<6;i++)
{
  digitalWrite(led,HIGH);
  delay(200);
  digitalWrite(led,!HIGH);
  delay(200);
}
for(int i=0;i<4;i++)
{
  digitalWrite(led,HIGH);
  delay(600);
  digitalWrite(led,!HIGH);
  delay(600);
}
for(int i=250;i>0;i--)
{
  analogWrite(led,i);
  delay(15);
}
analogWrite(led, 8);
delay(1500);
}
«« Back to Assignments
Week10 - Implications & applications << BACK___NEXT >> Week12 - Skin electronics
«« Back to Students