Class 5 : e-textiles & Wearables
Thermosensor knitted tea cup
Technics
- Thermo sensor
Tools
- 3D Print
- lilypad pack
- thermic sensor
- led
- pliers
- Amperemeter
- Scale


Assignment Project Description
The students will have to produce one soft sensor experimenting with the materials available at the lab. Trying to reproduce the same sensor with different materials/techniques (hard/hard hard/soft soft/soft).
Make a knitted tea cup that flashes when the water is too hot. I wanted to use wool for its thermal insulating properties to keep tea hotter longer and warm hands without burning. and SILICONE elastomers have a very high heat and cold inertia in continuous operation. from -60° C (up to -100° C for special types) to +200° C (up to +315° C for special types) At these temperatures it retains almost all its chemical, mechanical and dielectric properties.
Inspirations & References
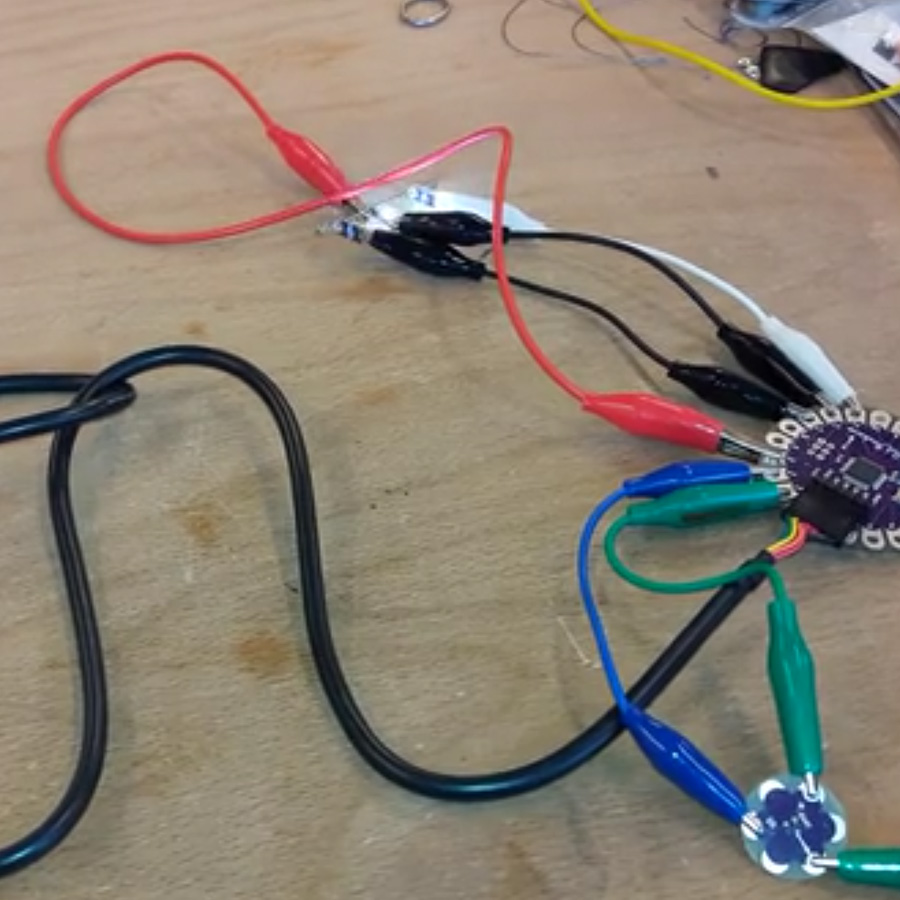
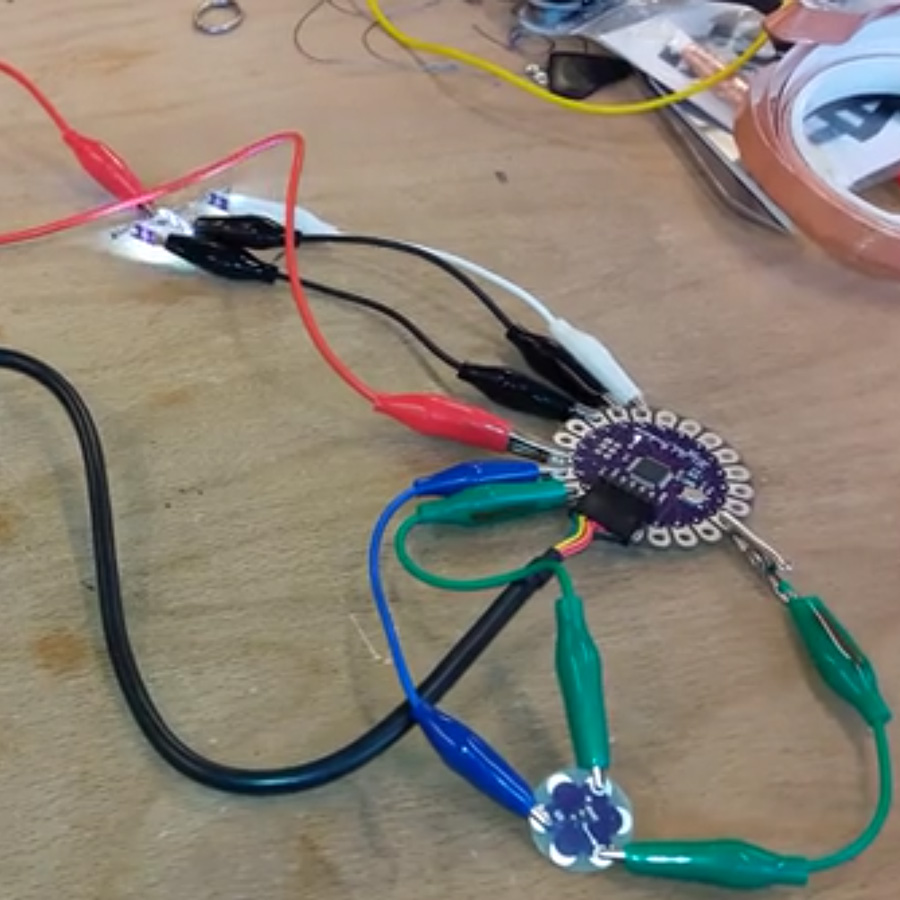
Lilypad and thermosensor
on the first video, the 3 LEDs light up and vary when the temperature is above 1 degrees Celsius. on the second video, the console indicates the temperature of the thermosensor.
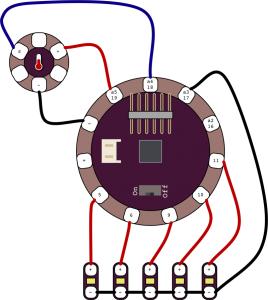
1/ mount the circuit and test the sketch
The LilyPad Temperature Sensor has three sew tabs - Power (+), Ground (-), and Signal (S). The signal tab will be connected to an analog tab (marked with an ‘A’) on a LilyPad Arduino.
The LilyPad Temperature Sensor lets you detect temperature changes in the environment (or an object pressed against the sensor) on your wearable project.
You will need to connect the sensor to a LilyPad Arduino or other microcontroller to read the output values and use in your code.
for the moment the editing is working but the variables are not adjusted as I would like.
- LEDs are off when the temperature is below 15 degrees Celsius
- 2 LEDs illuminate when the temperature is between 16 degrees and 34 degrees
- 3 LEDs illuminate when temperature is above 35 degrees Celsius
I modified the code :
- to match the variables to the lilypad pin
int lightPin1 = 11;       //put the LED light on pin 5
int lightPin2 = 12;       //put the LED light on pin 6
int lightPin3 = 13;       //put the LED light on pin 9


int groundPin1 = 16;    //setting 16 to be another – (ground) pin
int positivePin = 18;   //setting 19 to be a positive pin.
- from the console display to have the temperature displayed in degrees Celsius
- The temperature sensor board will output specific voltage at set temperatures - 10mV for every degree Celsius (°C), with 0 degrees C set at 0.5V. The current flowing through the signal tab can be read by an analog tab on a LilyPad Arduino board and converted through a formula to degrees in Celsius or Fahrenheit.
- The sensor produces an analog voltage representing the temperature near it. In order to get readings in degrees, we’ll have to do some math. The voltage output from the sensor is linearly proportional to the Celsius temperature. Once you know the output voltage of the sensor, you can calculate the temperature with this equation:Celsius = (voltage - 0,5) x 100.
// print out the voltage
Serial.print(" – ");
Serial.print(voltage);
Serial.println(" volts");

// now print out the temperature
float temperatureC = (voltage – 0.5) * 100 ;
//(voltage - 0.5) * 100 ;//converting from 10 mv per degree with 500 mV offset

//to degrees ((voltage – 500mV) times 100)
Serial.print(temperatureC);
Serial.println(" degrees C");

// now convert to Fahrenheight
//float temperatureF = (temperatureC * 9.0 / 5.0) + 32.0;
//Serial.print(temperatureF);
//Serial.println(" degrees F");
- the variation of the leds according to the temperature
else if (temperatureC >= 1) { //below 12C and above or equal to 1C, the lights fade in and out
[c]

//#define aref_voltage 4.08         // This is a reference voltage for your power supply: as 4.08
//but measure it with a multimeter when running and add in the correct voltage.

// ‘int’ is short for ‘integer’ = whole number

int tempPin = 18;        // the analog pin is connected to temp sensor
//the resolution is 10 mV / degree centigrade with a
//500 mV offset to allow for negative temperatures
int tempReading;        // the analog reading from the sensor

int lightPin1 = 11;       //put the LED light on pin 5
int lightPin2 = 12;       //put the LED light on pin 6
int lightPin3 = 13;       //put the LED light on pin 9


int groundPin1 = 16;    //setting 16 to be another – (ground) pin
int positivePin = 18;   //setting 19 to be a positive pin.

int brightness1 = 0;    // how bright the LED is
int fadeAmount1 = 5;    // how many points to fade the LED by

int brightness2 = 25;    // how bright the LED is
int fadeAmount2 = 5;    // how many points to fade the LED by

int brightness3 = 45;    // how bright the LED is
int fadeAmount3 = 5;    // how many points to fade the LED by


void setup(void) {
// To send debugging information via the Serial monitor
Serial.begin(9600);

pinMode(lightPin1, OUTPUT); //Setting LED 1 (lightPin1) to be an output. Ditto for each of the other 5 LEDs
pinMode(lightPin2, OUTPUT);
pinMode(lightPin3, OUTPUT);
pinMode(groundPin1, OUTPUT);
pinMode(groundPin2, OUTPUT);
pinMode(positivePin, OUTPUT);
digitalWrite(groundPin1, LOW);    //digitalwrite is ‘set the value of this pin to be …. LOW = minus , HIGH = positive’
digitalWrite(groundPin2, LOW);    //digitalwrite is ‘set the value of this pin to be ….’
digitalWrite(positivePin, HIGH);  //digitalwrite is ‘set the value of 19 to be positive
}

void loop(void) {

tempReading = analogRead(tempPin);  //Get a temperaure reading from the temp sensor

Serial.print("Temp reading = "); // allow the temp reading to appear in debugging > Serial Monitor
Serial.print(tempReading);     // the raw analog reading

// converting that reading to voltage, which is based off the reference voltage
float voltage = tempReading * aref_voltage;
voltage /= 1024.0;

// print out the voltage
Serial.print(" – ");
Serial.print(voltage);
Serial.println(" volts");

// now print out the temperature
float temperatureC = (voltage – 0.5) * 100 ;
//(voltage - 0.5) * 100 ;//converting from 10 mv per degree with 500 mV offset

//to degrees ((voltage – 500mV) times 100)
Serial.print(temperatureC);
Serial.println(" degrees C");

// now convert to Fahrenheight
//float temperatureF = (temperatureC * 9.0 / 5.0) + 32.0;
//Serial.print(temperatureF);
//Serial.println(" degrees F");

if (temperatureC >= 12) { // above 12C the light goes off

digitalWrite(lightPin1, LOW);
digitalWrite(lightPin2, LOW);
digitalWrite(lightPin3, LOW);


}

else if (temperatureC >= 1) { //below 12C and above or equal to 1C, the lights fade in and out

// set the brightness of all five LEDS:
analogWrite(lightPin1, max(brightness1, 0));
analogWrite(lightPin2, max(brightness2, 0));
analogWrite(lightPin3, max(brightness3, 0));


// change the brightness for next time through the loop:
brightness1 = brightness1 + fadeAmount1;
brightness2 = brightness2 + fadeAmount2;
brightness3 = brightness3 + fadeAmount3;

// reverse the direction of the fading at the ends of the fade:
// Also allow the brightness down to -20 to make the LED fade to black for longer
if (brightness1 == -20 || brightness1 == 100) {
fadeAmount1 = -fadeAmount1;

}

if (brightness2 == -20 || brightness2 == 100) {
fadeAmount2 = -fadeAmount2;

}

if (brightness3 == -20 || brightness3 == 100) {
fadeAmount3 = -fadeAmount3;

}

}
else //If temp drops below 1C, the lights will change status to blink randomly (in sequence)

{

digitalWrite(lightPin1, HIGH);   // set the LED on
delay(random(100, 400));              // blink randomly
digitalWrite(lightPin1, LOW);    // set the LED off
delay(random(100, 400));               // blink randomly
digitalWrite(lightPin2, HIGH);   // set the LED on
delay(random(100, 400));               // blink randomly
digitalWrite(lightPin2, LOW);    // set the LED off
delay(random(100, 400));               // blink randomly
digitalWrite(lightPin3, HIGH);   // set the LED on
delay(random(100, 400));               // blink randomly
digitalWrite(lightPin3, LOW);    // set the LED off
delay(random(100, 400));               // blink randomly


}

}

[/c]
Knitted tea cup design
1/knitting a piece of wool to the dimensions of your cup diameter


2/3d design of the cup bottom


3/pour the silicone into the 3D bottom mould

4/ Pour silicone on the knit to stiffen and make it waterproof
the ecoflex silicone must be spread out in order for it to enter the fibre.


5/ Assemble the bottom part with the silicone knitted fabric and make a holl for the led
EEcoflex silicone has been absorbed into the knitted wool fibres. The amount and thickness of silicone covering the knitted fabric can no longer stretch the fibre around the cup.