Assignment 3
“Document how soft interlocking connection has been designed and fabricated; how the connection either creates a full garment or has been applied to the seams; show the connection is well designed and holds the pulls/ stretch of a garment include all downloaded files in your documentary”
10.10.2017, Tuesday
Zoe Romano - my mentor- was the leading head of the giving assignment. My colleagues and me are able to explore our creativity to the fullest! First of all Z. Romano provided an informative presentation. Afterwards we need to ask ourself “ which material we want to use and also which mold in order to create something innovative”. However she also explains steps like creating,producing and also selling contributing to fabricate a brand. More or less we focus on the first step- creating.
1. Paper and Pencil
Tools: transparent paper; pencil; geometry set square; rubber; patterns


It was time consuming when it comes to the point which modular elements, structures and connections I want to create. After a while I was interested in creating a clutch. Since it is an important fashion guideline for women. Initially I sketched a modular part on transparent paper with the help of a template we received from Adriana. Using a geometry set enables me to sketch straight lines which amounts 57mm - 5,7 cm ( above figure )
I also needed to add on my sketch a connection to interlock all parts together eventually. Therefore positive/negative feedbacks should be included!! In the below figure you can see my negative feedback ( the lines) which are purposefully opposite to my positive feedback.
Measurements of positive and negative feedback:
- Positive feedback:


- Negative Feedback
The negative feedback is located opposite to the positive feedback. For that reason the negative feedback are the two squared lines. The determination of those lines is 2 cm=20 mm. It has the same measurements like the line of the positive feedback shown in the third picture above. As a result the interlocks will be well designed. However I did the upper line of the positive feedback ( amounts roughly 2,5). Therefore the interlocking between positive and negative feedback is not stress/tight enough. Referring to this point I will go more on detail in the following.

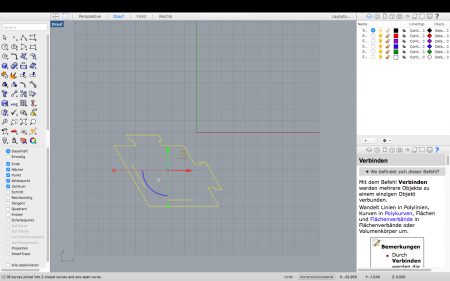
2. Vector software
Tool: Rhinoceros
Rhinoceros was needed in order to multiply my modular element. Steps while using Rhinoceros:
- library the shape, in my case a square
- measure my design
- create identical lines (75 mm) and connect them
- rotated the right/left side around 120 degree
- added the positive feedback here again around 120 degree and -60 degree
- create also identical lines with the measurements I mentioned above.
- Afterwards I also added the negative feedback opposite to the positive feedback (for a successfully interlocking eventually)
- activated “record history” and copied the original, so the copy and original do the same (when the original changes the copy changes automatically)
- Due to the fact that my front side of the clutch should differs. Therefore I put six total squared lines. I roated three of them around 120 degree; the other three lines around -60 degree. This process is relevant due to engravings.
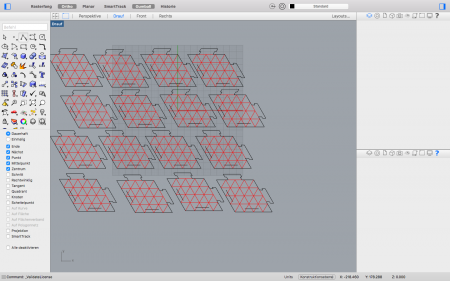
- left image: without engraving
- right image: with engravings
3. Laser Cutter
Tools: material (artifical leather); lasercutter;Rhinoceros
“The laser works cutting flat materials with a laser beam. Usually lasercuts in the DLY labs are from 40W to 120W to cut paper, textile, wood, plexiglass”
Adriana ALWAYS reminds us when we are going to use the Laser Cutter we need to make some tests for appropriate materials in order to know the right settings and therefore we will stop wasting on material! I didn't need to make any testings for synthetic leather since we have a book in which some settings of material are already giving. The simple reason for choosing the material was because I am literally in love with leather!! Additionally in the moment leather is really popular in fashion.
My main goal was to create something innovative when it comes to the appearance. It should be fierce!
Data's for the engraving
- Speed: 100
- Power: 10
- Frequency: 50
Data for the general form
- Speed: 100
- Power: 40
- Frequency: 50


4. Self-made modular fashion: Clutch


The CLUTCH has two different designs. The left figure represents the background and the right figure represents the foreground. This is my result for this assignment. However improvements need to be should implemented. Because I had the problem that my clutch is not tight enough. Therefore I want to work on this more intense. Due to the fact that I like my Idea and want to wear it anytime. When it comes to the question how did I create the clutch, firstly I interlocked the non-engraved and engraved parts together. Therefore I had a better overview. Secondly at the lower end, I overlapped then negative and positive feedbacks of the different parts. Eventually, at the top it is not interlocked it still open.